

In this blog post, I will explore various ways to optimize your Azure Backup costs. All the actions and features that are covered will assist you in utilizing Azure Backup in a cost-effective manner to safeguard your important and critical data.
It’s springtime again! As in previous years, Joe Carlyle and Thomas Thornton are leading Azure Spring Clean, a community initiative that encourages well-managed Azure tenants.
You can check out all the other blog posts or videos that can guide you with best practices, lessons learned, or help you with some of the more difficult Azure Management topics at https://www.azurespringclean.com.
You can also keep an eye on Twitter for the hashtag #AzureSpringClean so you won’t miss out on any of these Azure “spring” cleaning tips.
This year, I will focus on the different configuration settings, options, and tools that you can use to optimize your Azure Backup costs. So, let’s start “optimizing” and “cleaning”. 💸🧹
Table of Contents
- Estimate and calculate your Azure Backup costs
- Use a good Azure resource naming and tagging convention
- Set the correct storage redundancy option
- Optimize your backup policies and retention settings
- Store Long-Term-Retention backup data in the Vault-archive tier
- Azure IaaS VM backup selective disk backup
- Clean up unnecessary backups
- Use Azure policies for backup
Estimate and calculate your Azure Backup costs
Before attempting to estimate your actual Azure Backup costs, it is a good idea to know how the Azure Backup pricing model looks and, more importantly, how pricing is calculated.
And to start, you should know that the overall cost of an Azure Backup deployment can be affected by different factors, including:
- Every Azure Backup customer is charged a fixed cost, regardless of the specific services or amount of data and storage they use. This cost doesn’t depend on any other factors, and it must be paid each time you, as a customer, want to back up your data.
- The amount of bandwidth used to transfer data also impacts the cost of Azure Backup. The higher the amount of bandwidth consumed during backups, the higher the cost.
- Another factor you should keep in mind that can influence your Azure Backup cost is the total amount of storage space used by your backup data. This one itself can be influenced by various factors such as backup sizes, retention periods, backup frequency, and storage types.
- It’s worth noting that there are no transaction fees or charges for geo-replication, restore, or egress traffic during backup recovery when you use Azure Backup.
When you read all of the above, you can see that a lot of factors can have an influence on your actual Azure Backup cost. Luckily, to make it all a little bit easier, you should focus on two main components, namely Protected Instances and Backup Storage
The actual backup price is primarily influenced by the type of workload being backed up, and, specifically, the size of each protected instance, which is categorized into three categories. The different types of workloads you can backup with Azure Backup at the time of this writing are listed below:
- Azure virtual machines (VMs)
- On-premises servers
- SQL Server on Azure VMs
- SAP HANA on Azure VMs
- Azure Files
- Azure Database for PostgreSQL
- Azure Blobs
- Azure disks
Next to that, the second component that influences your Azure Backup pricing is backup storage. As backup storage, Azure Backup uses Blob storage in the form of storage accounts. These storage accounts are maintained completely separately from any customer tenants to enhance security.
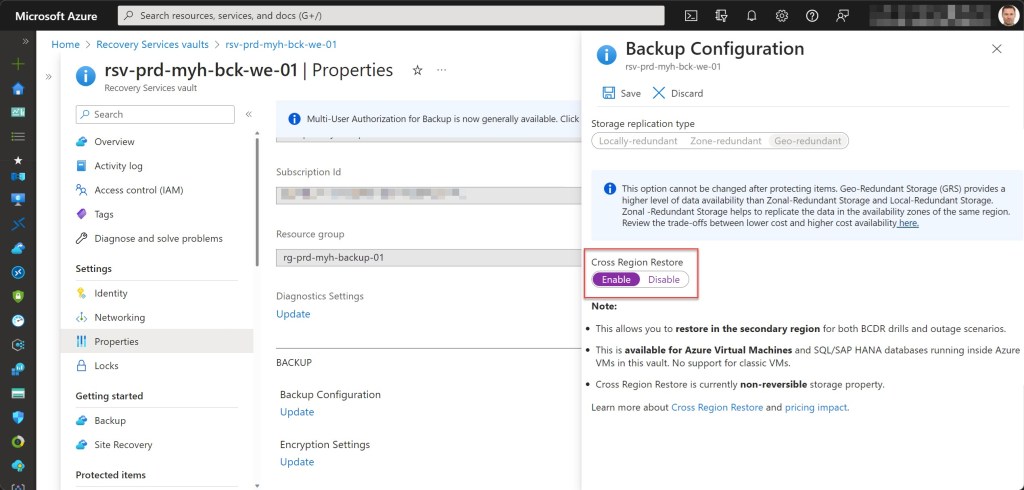
You, as a customer, have the option to choose between locally redundant storage (LRS), zone redundant storage (ZRS), geo-redundant storage (GRS), or read-access geo-redundant storage (RA-GRS*) to store your backups.
*When you enable Cross Region Restore, your backup GRS storage will be automatically upgraded to RA-GRS storage. Enabling this option will permit you to restore your backup data in a secondary paired region, but it will also affect your Azure Backup pricing.
Luckily, Microsoft also provides documentation and tools to assist you in making a good estimation of your Azure Backup costs.
The one most everyone knows about is probably the Azure Pricing Calculator, which can already help you make a good pricing estimation for your Azure Backup implementation.
When calculating your Azure Backup pricing estimate, it is crucial to select the appropriate region, protected instance type, backup policy, backup storage data characteristics, and currency.

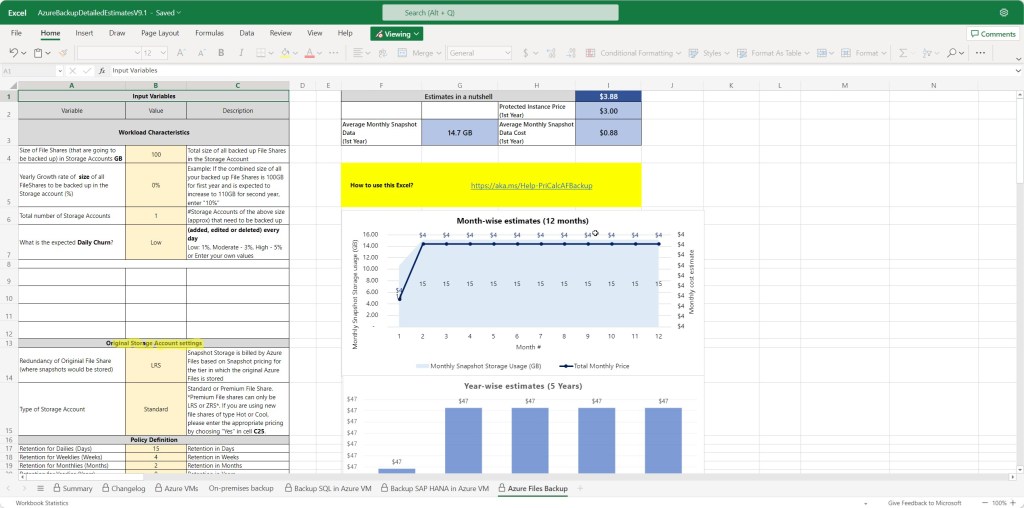
Next to using the Azure Pricing Calculator, you can also use the Azure Backup pricing webpage to help you make a good estimation of your Azure Backup overall cost.

However, because multiple factors can influence the overall cost, especially when backing up a large set of different resources, the Azure Backup pricing estimator can help you make a more accurate estimation. This Excel sheet allows you to fine-tune different parameters that can have an impact on your Azure backup costs at the end of the month.
Use a good Azure resource naming and tagging convention
Just like with all your other resources, you should use a good and clear naming convention for naming your Recovery Services vault(s), which follows your overall naming convention. After all, this can only help you locate specific recovery vaults more efficiently during various management tasks, such as cost optimization.
The naming convention I usually use to name my or my customers’ Recovery Services vault(s) is built up as follows:
rsv-<environment>-<customer abbreviation>-<rsv type>-<location>-<##>
Some examples are: rsv-hub-myh-bck-we-01; rsv-prd-myh-bck-we-01; rsv-dev-myh-bck-ne-02; rsv-prd-myh-asr-we-01

As you can see in the above screenshot, if Azure Site Recovery is also used in the same Azure subscription, I also always recommend creating a separate recovery services vault for this so that disaster recovery processes can work independently of all backup processes.
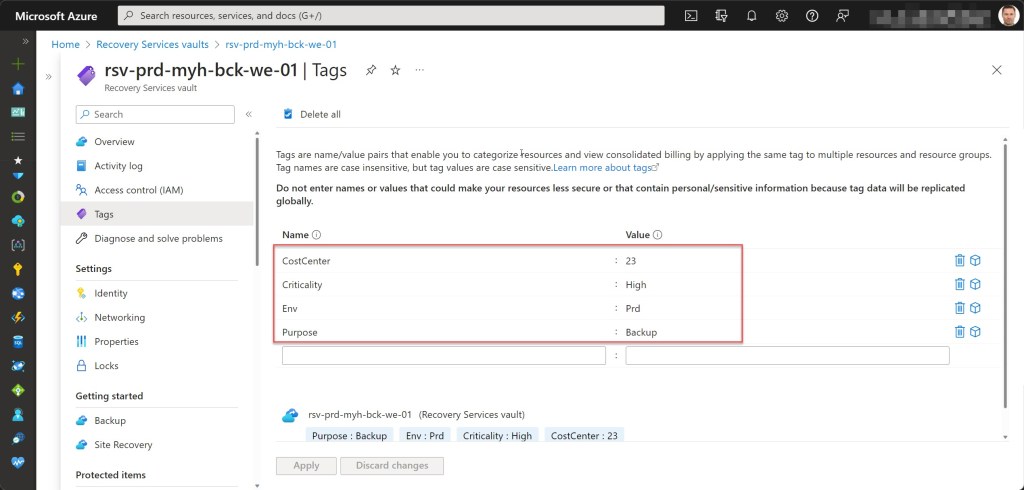
Next to that, the tags I mostly use in combination with Azure Backup recovery services vault, next to the ones describing the “Environment” and the “Criticality“, are the ones describing the “CostCenter“, and the “Purpose“. From a cost perspective point of view, especially the “CostCenter” tag, it is quite important.
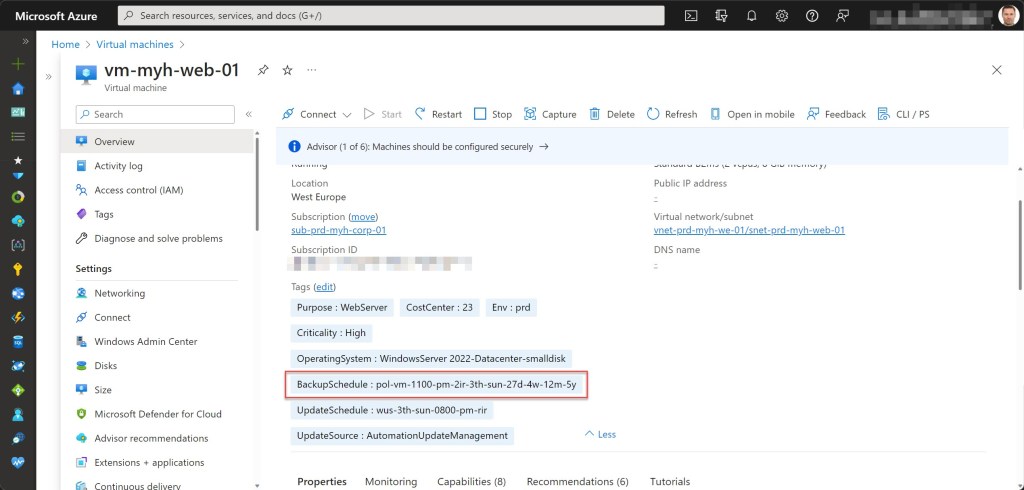
Another tag I mostly use in combination with Azure Backup, but then on the resources being backed up, is one that describes the backup policy. In this way, it is quite easy to see if a resource is backed up and with which backup policy.
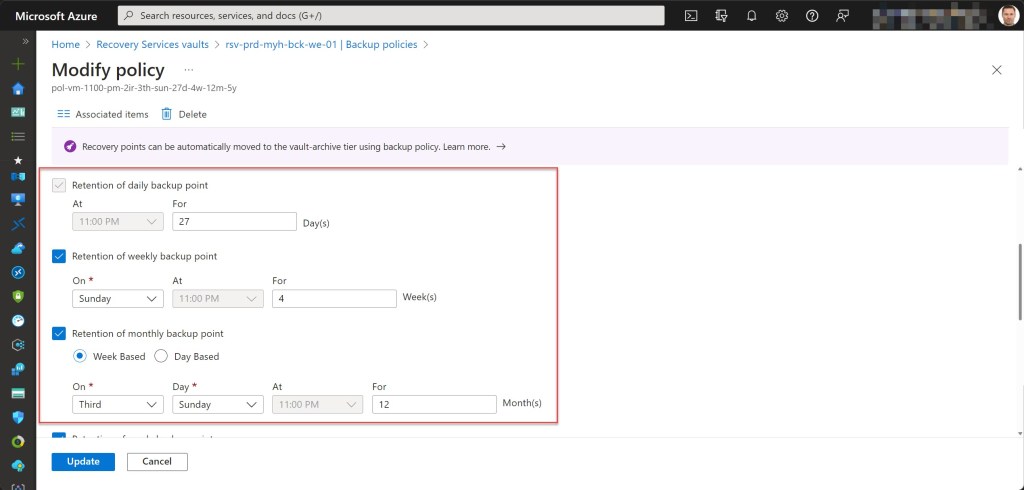
BackupSchedule : pol-<resource type>-<time>-<ante meridiem>-<number of instance restore points if applicable>-<week number>-<day of the week>-<number of daily backups>-<number of weekly backups>-<number of monthly backups>-<number of yearly backups>
Some examples are: BackupSchedule : pol-vm-1100-pm-2ir-3th-sun-27d-4w-12m-5y; BackupSchedule : pol-fs-0900-pm-2nd-sat-27d-4w-12m-3y


Set the correct storage redundancy option
As already mentioned, you can choose between LRS, ZRS, or GRS as options for the storage replication type for your backup storage. Choosing the right replication type is important not only from a performance and resiliency point of view but also from a cost perspective.
Next to that, you should also know, and this is something that is very important, that you can only change this setting before you have stored any backup data in a recovery services vault.
When backing up any business-critical or production resources, I recommend that customers configure the replication type of their recovery services vault to GRS (or ZRS). For non-production resources, I mostly advise setting it to LRS to lower the costs.


If both types of resources exist in the same subscription, my approach is to deploy two separate Recovery Services vaults. One vault is configured with replication set to LRS to back up all non-production resources and the other with replication set to GRS (or ZRS) to backup any of the production resources.

Optimize your backup policies and retention settings
When using Azure Backup to backup any of their business-critical or non-critical workloads, a lot of organizations use the DefaultPolicy or specify their own policy without really knowing or thinking about their Recovery Time Objective (RTO) and Recovery Point Objective (RPO) or any Service Level Agreement (SLA) or compliance requirements.
As a result, backup policies are often created with the best effort or the most logical settings at the time of creation or based on the recommendations provided by their service provider.
And this can also have an impact on their Azure Backup costs, because longer retention durations, not configuring tiering settings, or longer instant restore (snapshot) settings can all have an impact on the pricing of your Azure Backup configuration.
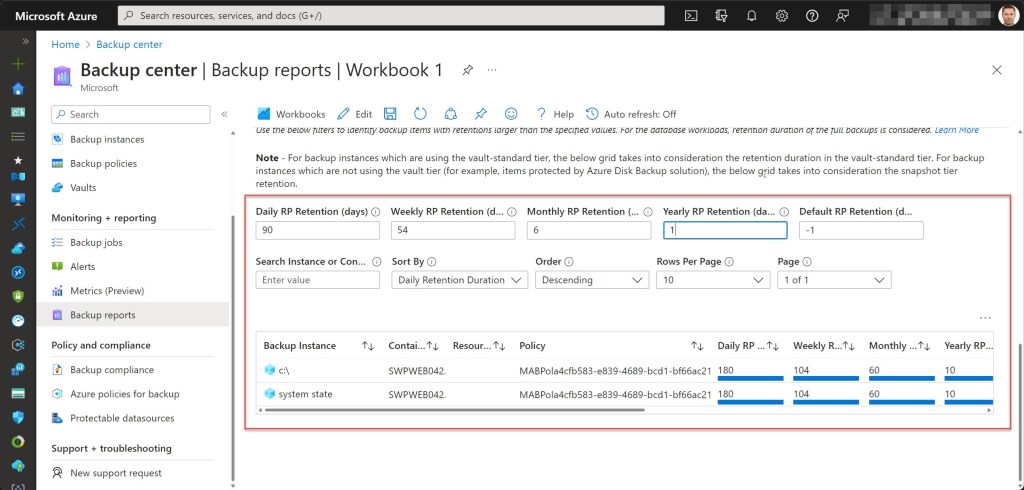
So, it is always a good idea and best practice to regularly review all backup policies to see if any optimization-related configurations can be applied, like shortening some retention durations or changing the instant restore option. But still, see that you follow your RTO, RPO, SLA, and compliance regulations when you reconfigure any of your backup policies.

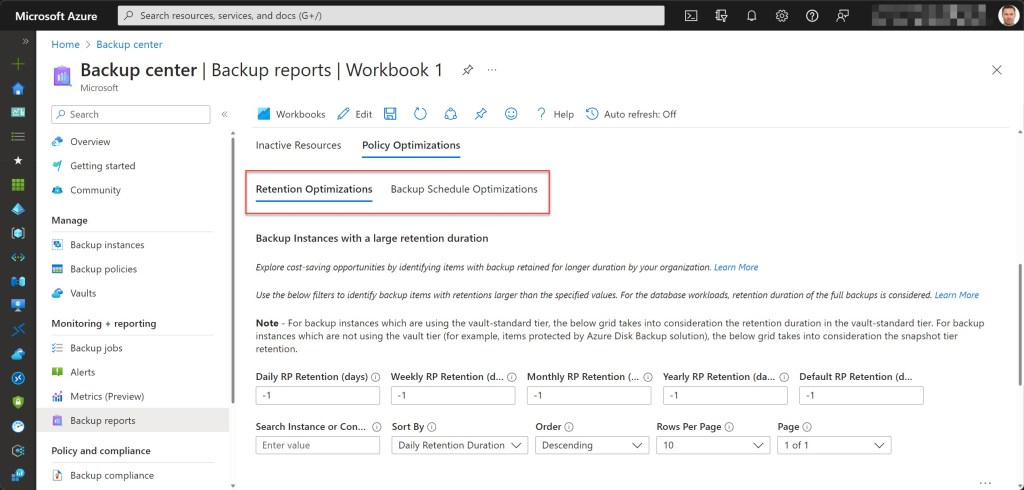
To make it easier to identify any possible retention or backup schedule optimizations, you can make use of the Backup reports workbooks that are part of the Backup center*.
*Backup Center is a solution that helps you manage backups for different Azure services (like VMs, SQL databases, and file shares) all in one place, without having to go to a specific Recovery Services vault. More information about Backup Center can be found here.

Store Long-Term-Retention backup data in the Vault-archive tier
Another best practice you can apply to lower your Azure Backup costs is to move your Long-Term-Retention (LTR) backup data to the Archive tier. At the moment, you can use the Vault-archive tier for storing backup data of your Azure VMs, SQL Servers in Azure VMs, and SAP HANA in Azure VMs*.
*You can find the support matrix for the workloads the Vault-archive tier supports over here.
Enabling the archive tier for Azure VM backups will convert all backup data from incremental to full backups. For SQL in VM backups, full backups will be directly moved to the archive tier.
To move any recovery points of a particular resource to the archive tier, open Backup center and select the backup item. Then select “click here” to view the list of all eligible recovery points. After you have selected the recovery points you want to move, just select Move recovery points to archive.


Azure IaaS VM backup selective disk backup
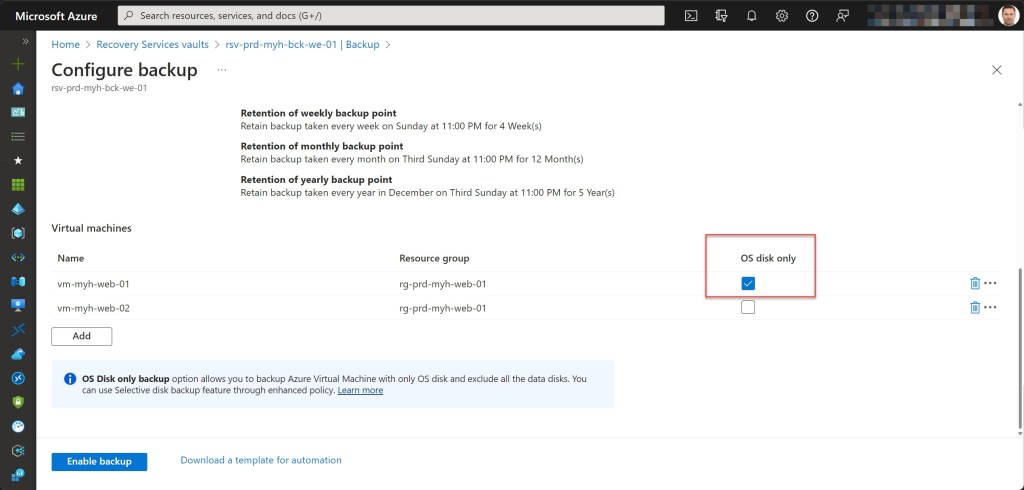
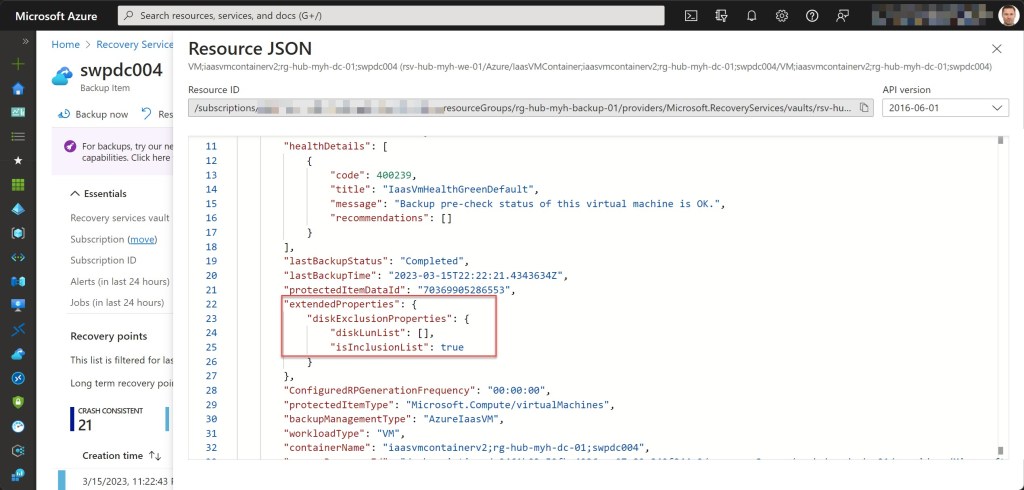
When you are backing up an Azure IaaS VM, instead of backing up all disks, including the operating system and all data disks, you can use the selective disk backup and restore feature to back up only a subset of the data disks or only the operating system disk.
This is particularly useful in scenarios where you are using another backup solution for part of your VM or data, like when you backup your databases using a different workload backup solution, and you want to use Azure VM-level backup for the rest of the data and disks. Or when you only need to backup critical data on one disk and don’t want a backup for the rest of the disks attached to a VM, to minimize the backup storage costs.
By only configuring the protection of the OS disk or certain data disks, you will minimize your backup storage costs because each recovery point will only contain the disks that were included in the backup operation, lowering the price by using less storage in the back (data disks) or lowering the Protected Instance fee when you configure the OS disk only backup option.
When using this option, there are some things of which you need to be aware, including the fact that it won’t work with any of your encrypted VMs, whether Linux or Windows.
Next to that, configuring the selective disk backup experience for a VM through the Azure portal is currently limited to the Backup OS Disk only option. And any backups with the Disk exclude setting set to “ON” only support the “Disk restore” option. So “VM restore” or “replace existing” restore options are not supported in this case.
Also, if you ever want to change the protection settings for a previously backed-up VM or VMs, such as excluding or including certain data disks, you can only make these modifications using either Azure CLI or PowerShell*.
*If you ever require them, you can find the Azure CLI commands and required Azure PowerShell cmdlets over here.
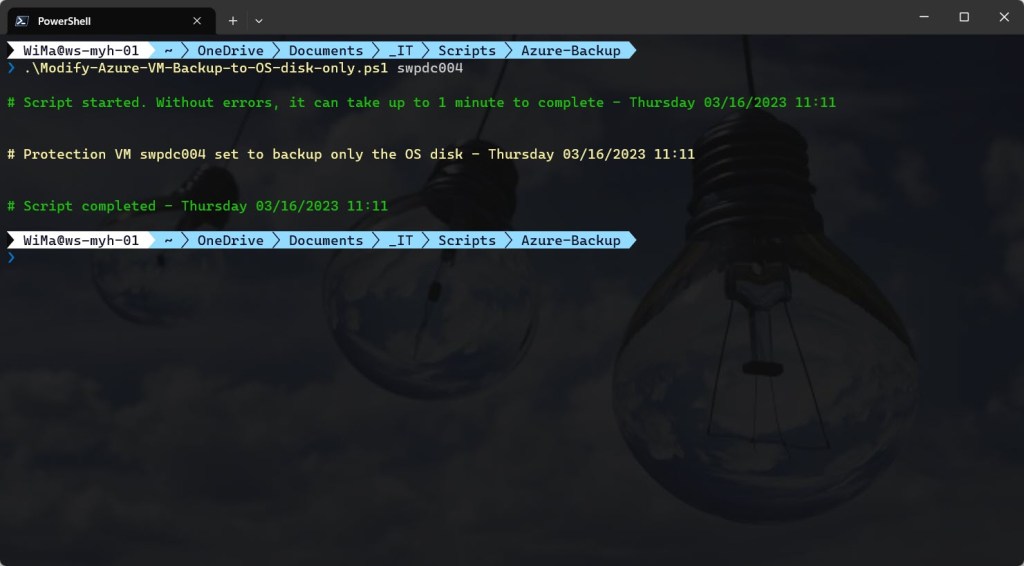
Below you can find an example of how to modify the protection of an Azure VM using Azure PowerShell to back up only the OS disk. To use it, just change all parameters, like ResourceGroupName, vaultName, FriendlyVMName, PolicyName to your own usage and settings.
## ---------------------------------------------------------------------------------------------------------------------------------------------------------------------------------------------

## Modify protection to only backup the OS disk

$vault = Get-AzRecoveryServicesVault -ResourceGroupName "rg-hub-myh-backup-01" -Name "rsv-hub-myh-we-01"
Set-AzRecoveryServicesVaultContext -Vault $vault
$container = Get-AzRecoveryServicesBackupContainer -ContainerType AzureVM -FriendlyName "swpdc004" -VaultId $vault.ID
$pol = Get-AzRecoveryServicesBackupProtectionPolicy -Name "pol-1100-pm-2ir-sun-27d-54w-12m-5y"

$backupItem = Get-AzRecoveryServicesBackupItem -Container $container -WorkloadType AzureVM -VaultId $vault.ID
Enable-AzRecoveryServicesBackupProtection -Item $backupItem -ExcludeAllDataDisks -VaultId $targetVault.ID -Policy $pol

## ---------------------------------------------------------------------------------------------------------------------------------------------------------------------------------------------
To make it easier, you can also download the complete script from my GitHub. Before using the script, adjust all variables to your needs, and then run the customized script from Windows Terminal, Visual Studio Code, or Windows PowerShell. Or you can simply run it from Cloud Shell.

You can also use Azure PowerShell to change the protection settings and re-enable the backup of all attached data disks for a specific Azure VM. To use it, change all parameters, such as ResourceGroupName, vaultName, FriendlyVMName, PolicyName to your own usage and settings.
Or you can download the complete script from my GitHub.
## ---------------------------------------------------------------------------------------------------------------------------------------------------------------------------------------------

## Reset data disk exclusion setting

$vault = Get-AzRecoveryServicesVault -ResourceGroupName "rg-hub-myh-backup-01" -Name "rsv-hub-myh-we-01"
Set-AzRecoveryServicesVaultContext -Vault $vault
$container = Get-AzRecoveryServicesBackupContainer -ContainerType AzureVM -FriendlyName "swpdc004" -VaultId $vault.ID
$pol = Get-AzRecoveryServicesBackupProtectionPolicy -Name "pol-1100-pm-2ir-sun-27d-54w-12m-5y"

$backupItem = Get-AzRecoveryServicesBackupItem -Container $container -WorkloadType AzureVM -VaultId $vault.ID
Enable-AzRecoveryServicesBackupProtection -Item $backupItem -ResetExclusionSettings -VaultId $targetVault.ID -Policy $pol

## ---------------------------------------------------------------------------------------------------------------------------------------------------------------------------------------------


Clean up unnecessary backups
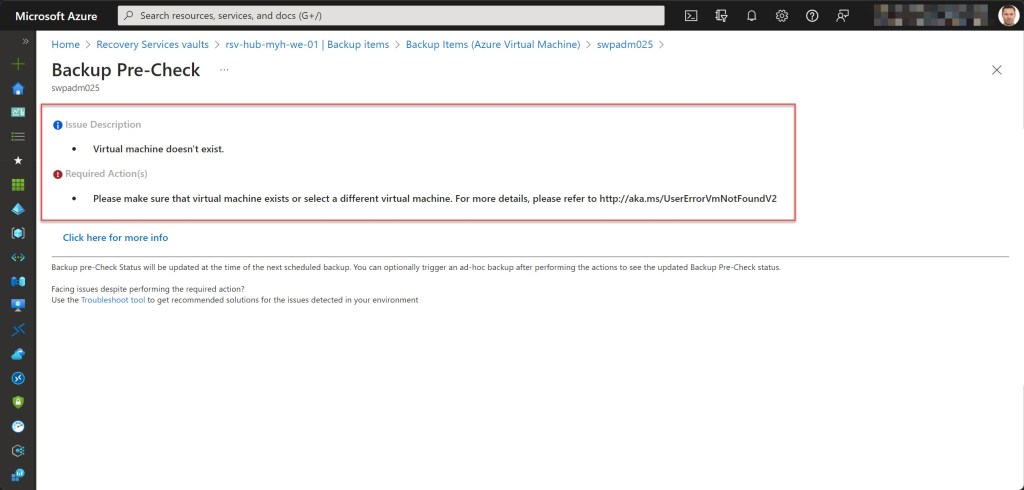
Another way you can optimize your Azure Backup costs is by cleaning up backups for resources that are no longer needed or do not exist anymore.
One way to identify unnecessary backups or inactive data sources is to go through all your recovery service vaults, but this can be difficult when you have many of them. But if you only have a few, just open a specific recovery service vault in your environment and look at every backup item to see if the Backup Pre-Check “resource” doesn’t exist is triggered, causing a critical issue and giving a failed backup.

A more efficient way, and especially if you have a large number of Recovery Services vaults, is to open Backup center, and go to the Backup Reports solution to identify any inactive resources still being backed up during the specified time range, which you can set up to 90 days.

Next, click on the “Inactive Resources” tile to view information about all the inactive resources within the selected scope. This will bring up a grid that displays details of each inactive resource.

Use Azure policies for backup
Finally, I would recommend configuring Azure Policy for backup to protect your backup settings and data and keep them in line with your organization’s standards and compliance regulations.
You can use all kinds of built-in policies to ensure that backup solutions are properly configured and managed, which is also important from a cost perspective.
For instance, you can set a policy that requires backup data to be stored in a certain location or requires a specific tag like “CostCenter” to be present.
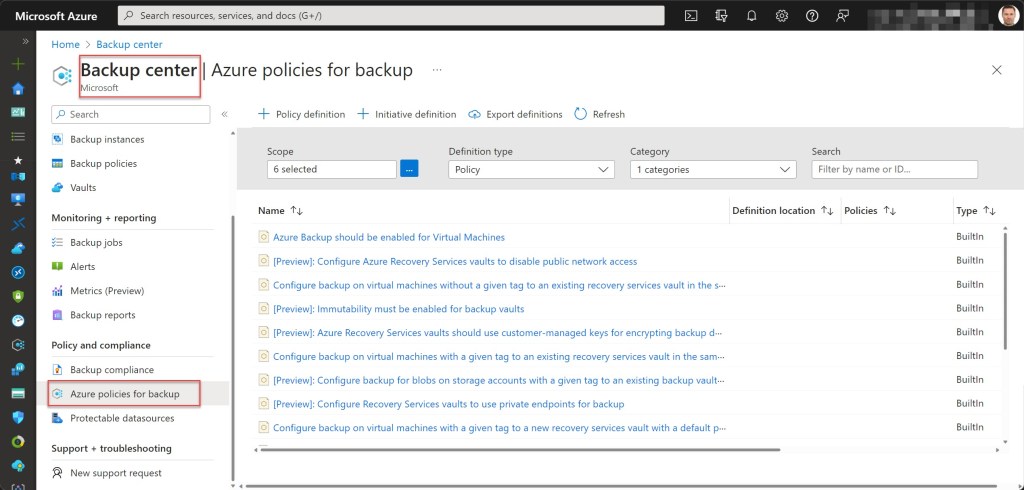
To quickly find all built-in policies or to enable a specific policy that you can use in combination with Azure Backup. Once again, open Backup center, and then select Azure policies for backup, underneath Policy and compliance.
You can then get an overview of all the built-in policies related to Azure Backup and then implement them within a specific scope in your environment.
Conclusion
By implementing some or all of the cost optimization actions, settings, and features discussed in this blog post, I hope you can save some money and get the most out of your Azure Backup environment.
And before ending this blog post, I just wanted to say that I am really happy to be part of this online event, and I hope you will also learn something new from any of the other blog posts or videos. Thanks again, Thomas Thornton and Joe Carlyle, for organizing! 🙏🏻
Next to that, if you have any questions or comments regarding this blog post, feel free to contact me through my Twitter handle, @wmatthyssen. I will be happy to help you out!
Happy reading 📖 and optimizing 💸!

Pingback: Azure Backup Costs