

In this blog post, I will show you how you can create 3 Azure Windows virtual machines (VMs) running Windows Server 2016, Windows Server 2019 and Windows Server 2022, for testing purposes with Azure PowerShell.
From time to time, I need to test an application or setting on a Windows Server, or I require a bunch of Windows VMs for training or research purposes. To automate the deployment process of these VMs and all their associated resources, I wrote the below Azure PowerShell script which does all of the following:
- Check if the PowerShell window is running as Administrator (which is a requirement), otherwise the Azure PowerShell script will be exited.
- Suppress breaking change warning messages.
- Change the current context to use a test subscription (a subscription with *tst* in the Subscription name will be automatically selected).
- Store a specified set of tags in a hash table.
- Create a resource group for the test VMs and all associated resources, if it not already exists. Also apply the necessary tags to this resource group.
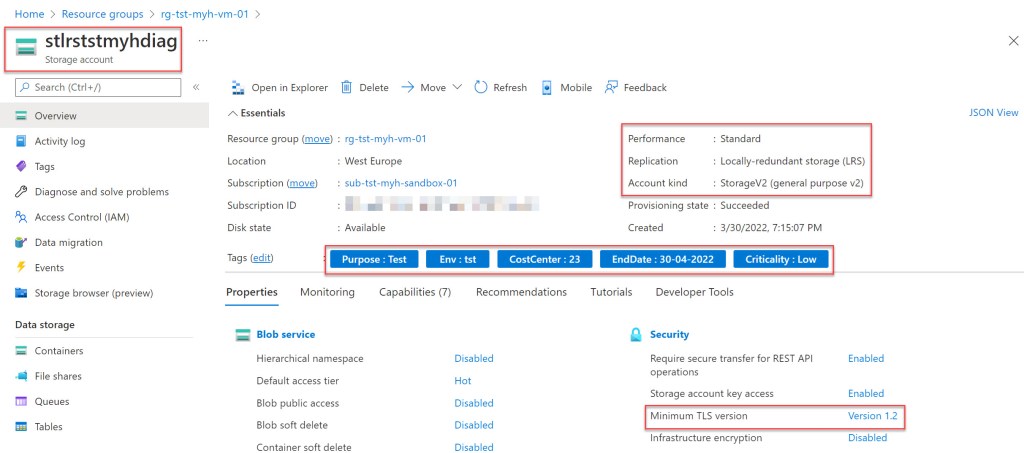
- Create a general purpose v2 storage account to store boot diagnostics with specific configuration settings, like minimum TLS version set to 1.2, allow public access set to disabled, if it not already exists. Also apply the necessary tags to this storage account.
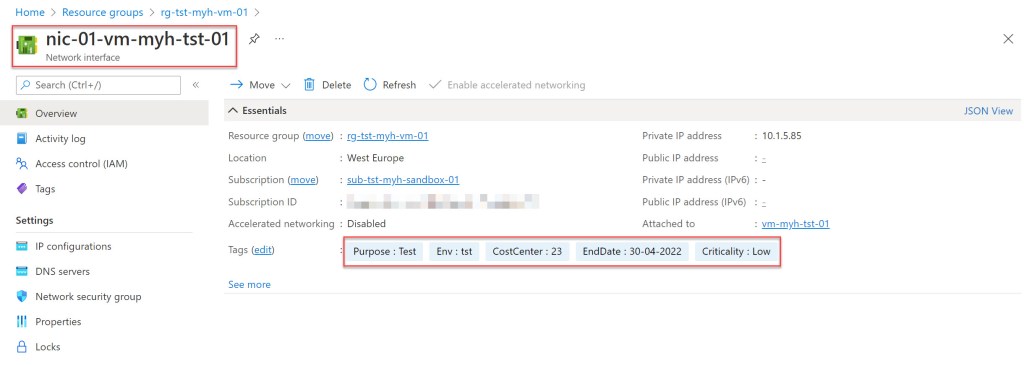
- Create 3 network interfaces (NICs), if they not already exist.
- Configure those 3 NICs with the first three free private IP address in the specified subnet, and set their assignment to Static. Also apply the necessary tags to these NICs.
- Specify the local administrator account and password (Username and Password).
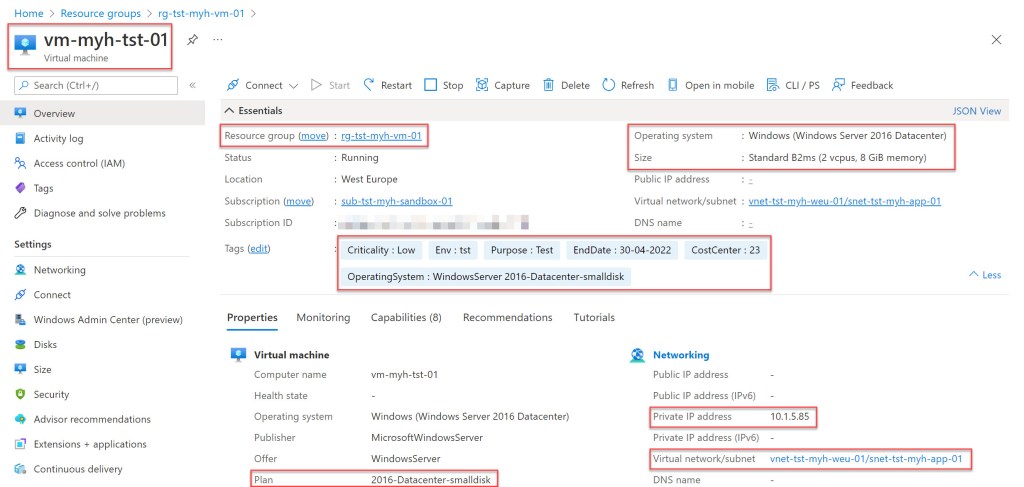
- Get the latest Azure Marketplace VMImage for Windows Server 2016, 2019 and 2022 that match the specified values (smalldisk images) and store it in a variable for later use. By using smalldisk images, you will reduce the cost of the OS disks.
- Create VM 1 (W2K16) and all other associated resources, like the Operating System (OS) and Data disks, if they don’t already exist.
- Create VM 2 (W2K19) and all other associated resources, like the OS and Data disks, if they don’t already exist.
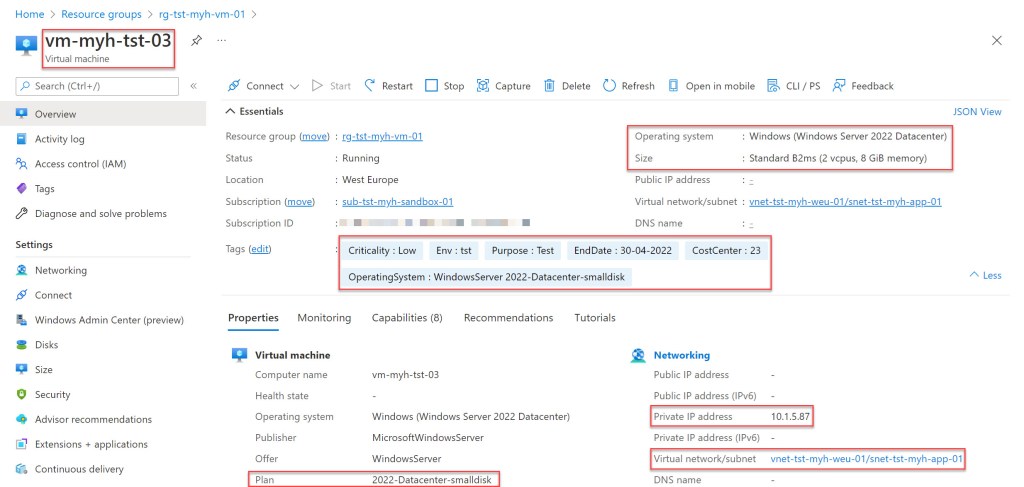
- Create VM 3 (W2K22) and all other associated resources, like the OS and Data disks, if they don’t already exist.
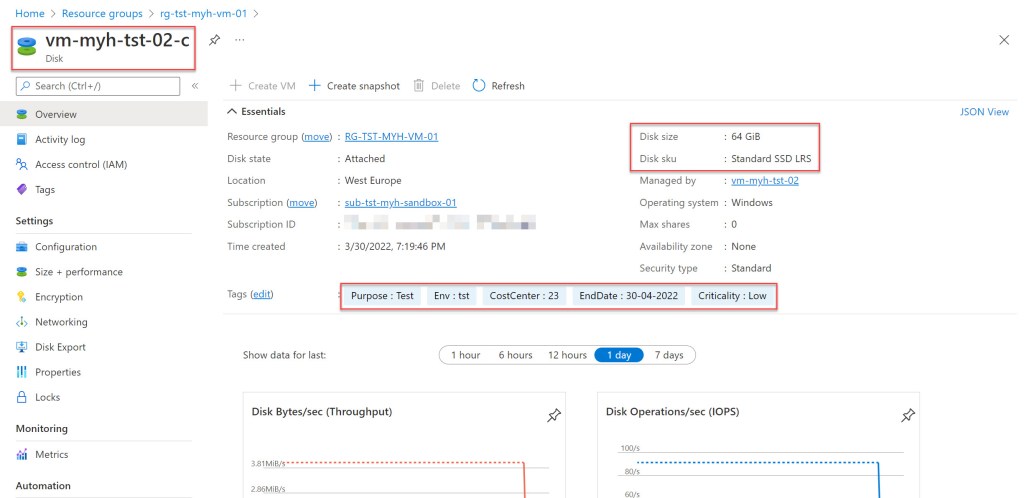
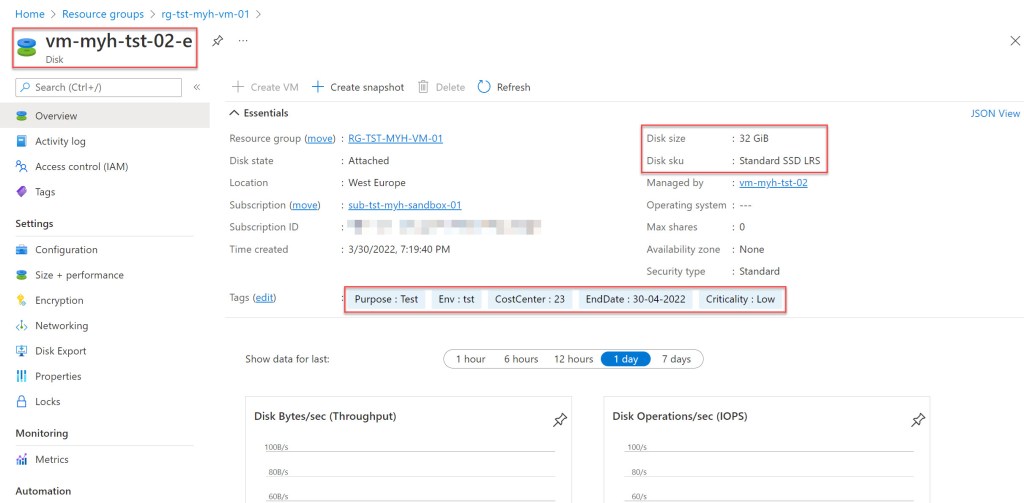
- Set tags on all disks in the resource group.
To use the script copy and save it as Create-3-Azure-Windows-VMs-running-W2K16-W2K19-W2K22-for-testing-purposes.ps1 or download it from GitHub. Then before using the script, adjust all variables to your use and then run the customized script with Administrator privileges from Windows Terminal, Visual Studio Code, or Windows PowerShell. Or you can simply run it from Cloud Shell.
Prerequisites
- An Azure Subscription (preferrable a subscription with *tst* in the Subscription name).
- An Azure Administrator account with the necessary RBAC roles.
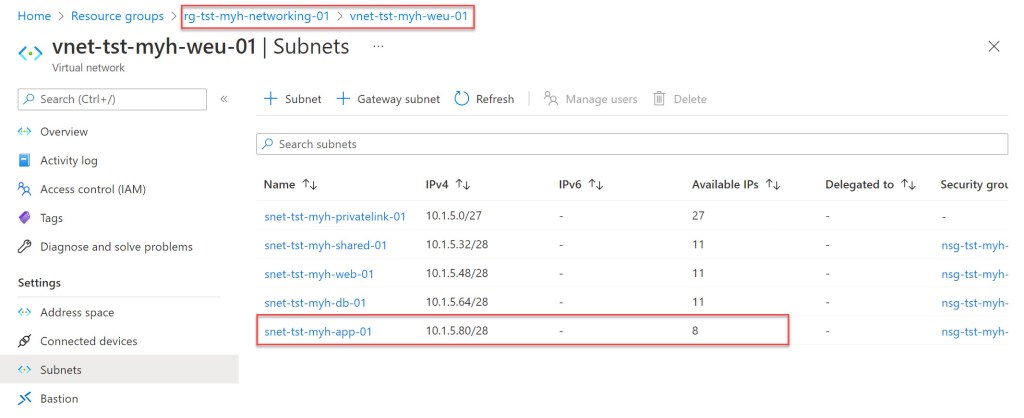
- An existing VNet and subnet with 3 available IP addresses.
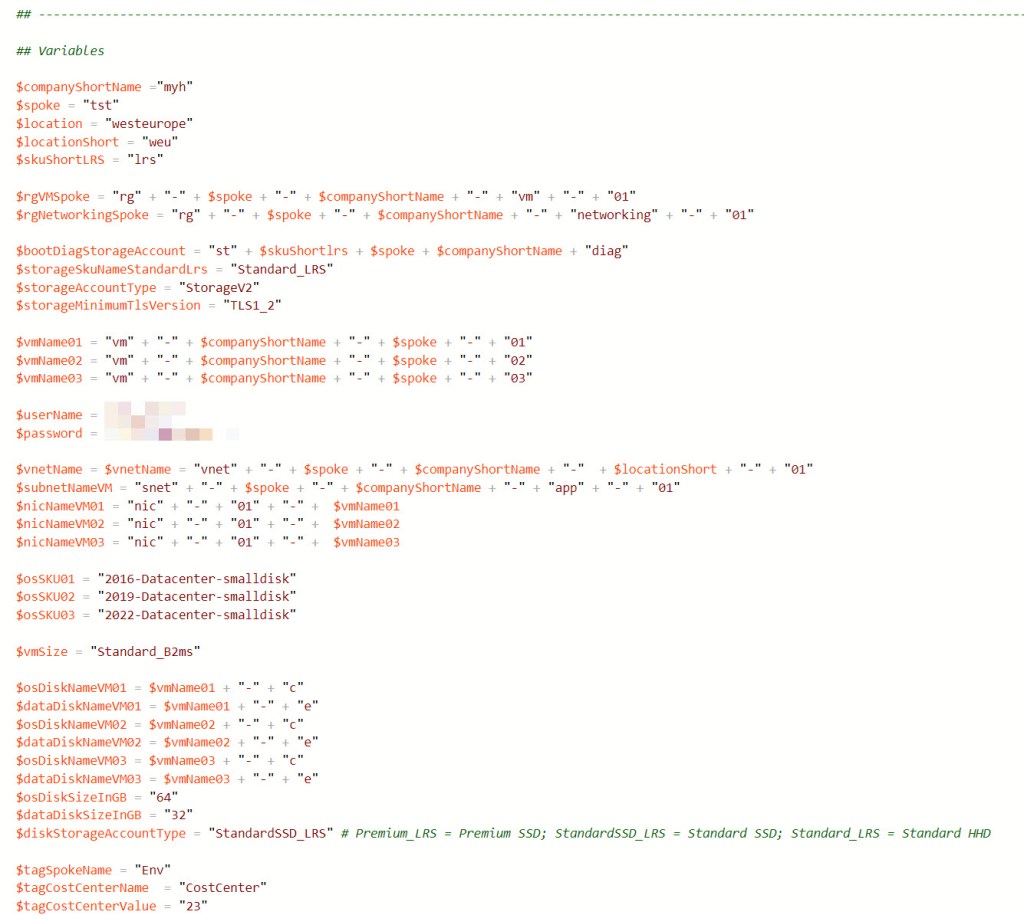
- Change all the variables in the script where needed to fit your needs (you can find an adjusted example in a screenshot below).
Azure PowerShell script
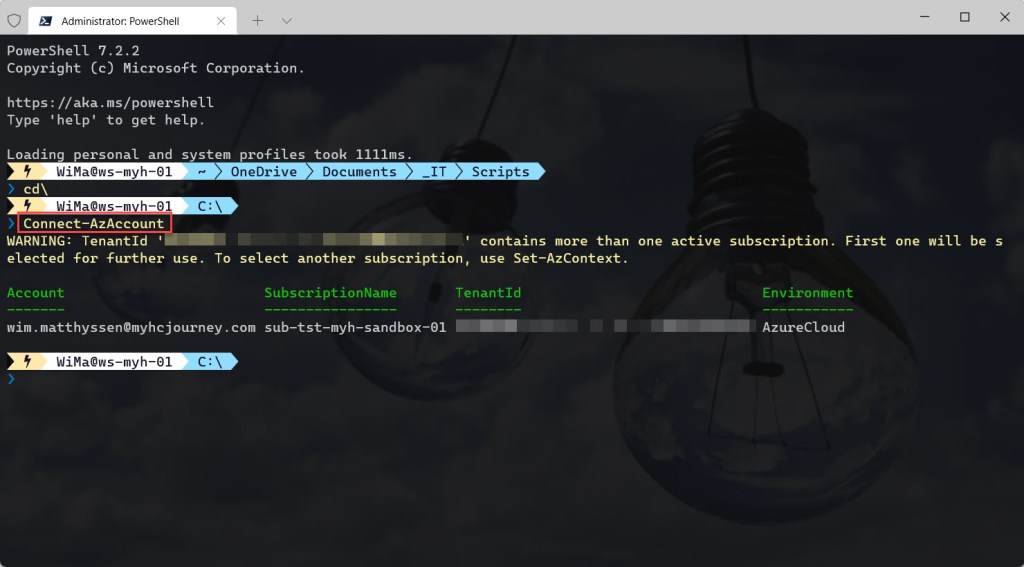
If you are not running the script from Cloud Shell, don’t forget to sign in with the Connect-AzAccount cmdlet to connect your Azure account.
<#
.SYNOPSIS
A script used to create 3 Azure Windows VMs running Windows Server 2016, Windows Server 2019 and Windows Server 2022, for testing purposes.
.DESCRIPTION
A script used to create 3 Azure Windows VMs running Windows Server 2016, Windows Server 2019 and Windows Server 2022, for testing purposes.
This script will do all of the following:
Check if the PowerShell window is running as Administrator (which is a requirement), otherwise the Azure PowerShell script will be exited.
Suppress breaking change warning messages.
Change the current context to use a test subscription (a subscription with *tst* in the Subscription name will be automatically selected).
Store a specified set of tags in a hash table.
Create a resource group for the test VMs and all associated resources, if it not already exists. Also apply the necessary tags to this resource group.
Create a general purpose v2 storage account to store boot diagnostics with specific configuration settings,like minimum TLS version set to 1.2, if it not already exists.
Apply the necessary tags to this storage account.
Create 3 network interfaces (NICs), if they not already exist.
Then configure those 3 NICs with the first three free private IP address in the specified subnet, and set their assignment to Static.
Apply the necessary tags to these NICs.
Specify the local administrator account and password (Username and Password).
Get the latest Azure Marketplace VMImage for Windows Server 2016, 2019 and 2022 that match the specified values (smalldisk images) and store it in a variable for later use.
Create VM 1 (W2K16) and all other associated resources, like the Operating System (OS) and Data disks, if they don’t already exist.
Create VM 2 (W2K19) and all other associated resources, like the OS and Data disks, if they don’t already exist.
Create VM 3 (W2K22) and all other associated resources, like the OS and Data disks, if they don’t already exist.
Set tags on all disks in the resource group.
.NOTES
Filename: Create-3-Azure-Windows-VMs-running-W2K16-W2K19-W2K22-for-testing-purposes.ps1
Created: 28/03/2022
Last modified: 07/04/2022
Author: Wim Matthyssen
PowerShell: Azure PowerShell
Version: Install latest Az modules
Action: Change variables where needed to fit your needs
Disclaimer: This script is provided "As Is" with no warranties.
.EXAMPLE
Connect-AzAccount
Get-AzTenant (if not using the default tenant)
Set-AzContext -tenantID "xxxxxxxx-xxxx-xxxx-xxxxxxxxxxxx" (if not using the default tenant)
.\Create-3-Azure-Windows-VMs-running-W2K16-W2K19-W2K22-for-testing-purposes.ps1
.LINK
https://wmatthyssen.com/2022/04/04/azure-powershell-script-create-three-azure-windows-vms-running-w2k16-w2k19-and-w2k22-for-testing-purposes/
#>
## ---------------------------------------------------------------------------------------------------------------------------------------------------------------------------------------------
## Variables
$companyShortName =#<your company short name here> The used company short name. Example: "myh"
$spoke = #<your spoke short name here> The used spoke short name. Example: "tst"
$location = #<your region here> The used Azure public region. Example: "westeurope"
$skuShortLRS = "lrs"
$rgVMSpoke = #<your VM rg here> The new Azure resource group in which the new VM resources will be created. Example: "rg-tst-myh-vm-01"
$rgNetworkingSpoke = #<your VNet rg here> The Azure resource group in which your existing VNet is deployed. Example: "rg-tst-myh-networking"
$bootDiagStorageAccount = "st" + $skuShortlrs + $spoke + $companyShortName + "diag"
$storageSkuNameStandardLrs = "Standard_LRS"
$storageAccountType = "StorageV2"
$storageMinimumTlsVersion = "TLS1_2"
$vmName01 = "vm" + "-" + $companyShortName + "-" + $spoke + "-" + "01"
$vmName02 = "vm" + "-" + $companyShortName + "-" + $spoke + "-" + "02"
$vmName03 = "vm" + "-" + $companyShortName + "-" + $spoke + "-" + "03"
$userName = #<your VM username here> The VM user name here. Example: "tstadmin23"
$password = #<your VM password here> The VM password here. Example: "P@ssw0rd;1234"
$vnetName = #<your VNet name here> The existing VNet in which the VM resources will be created. Example: "vnet-tst-myh-weu"
$subnetNameVM = #<your subnetname here> The existing VNet in which the VM resources will be created. Example: "snet-tst-myh-app-01"
$nicNameVM01 = "nic" + "-" + "01" + "-" + $vmName01
$nicNameVM02 = "nic" + "-" + "01" + "-" + $vmName02
$nicNameVM03 = "nic" + "-" + "01" + "-" + $vmName03
$osSKU01 = "2016-Datacenter-smalldisk"
$osSKU02 = "2019-Datacenter-smalldisk"
$osSKU03 = "2022-Datacenter-smalldisk"
$vmSize = "Standard_B2ms"
$osDiskNameVM01 = $vmName01 + "-" + "c"
$dataDiskNameVM01 = $vmName01 + "-" + "e"
$osDiskNameVM02 = $vmName02 + "-" + "c"
$dataDiskNameVM02 = $vmName02 + "-" + "e"
$osDiskNameVM03 = $vmName03 + "-" + "c"
$dataDiskNameVM03 = $vmName03 + "-" + "e"
$osDiskSizeInGB = "64"
$dataDiskSizeInGB = "32"
$diskStorageAccountType = "StandardSSD_LRS" # Premium_LRS = Premium SSD; StandardSSD_LRS = Standard SSD; Standard_LRS = Standard HHD
$tagSpokeName = #<your Environment tag name here> The environment tag name you want to use. Example:"Env"
$tagCostCenterName = #<your Cost Center tag name here> The Cost Center tag name you want to use. Example:"CostCenter"
$tagCostCenterValue = #<your Cost Center tag value here> The Cost Center tag value you want to use. Example: "23"
$tagCriticalityName = #<your Criticality tag name here> The Criticality tag name you want to use. Example:"Criticality"
$tagCriticalityValue = #<your Criticality tag value here> The Criticality tag value you want to use. Example: "Low"
$tagPurposeName = #<your Purpose tag name here> The Purpose tag name you want to use. Example:"Purpose"
$tagPurposeValue = #<your Purpose tag value here> The Purpose tag value you want to use. Example:"Test"
$tagEndDateName = #<your End Date tag name here> The End Date tag name you want to use. Example:"EndDate"
$tagEndDateValue = #<your End Date tag value here> The End Date tag value you want to use. Example:"30-04-2022"
$tagOSVersionName = #<your OS Version tag name here> The OS Version tag name you want to use. Example:"OperatingSystem"
$global:currenttime= Set-PSBreakpoint -Variable currenttime -Mode Read -Action {$global:currenttime= Get-Date -UFormat "%A %m/%d/%Y %R"}
$foregroundColor1 = "Red"
$foregroundColor2 = "Yellow"
$writeEmptyLine = "`n"
$writeSeperatorSpaces = " - "
## ---------------------------------------------------------------------------------------------------------------------------------------------------------------------------------------------
## Check if PowerShell runs as Administrator (when not running from Cloud Shell), otherwise exit the script
if ($PSVersionTable.Platform -eq "Unix") {
Write-Host ($writeEmptyLine + "# Running in Cloud Shell" + $writeSeperatorSpaces + $currentTime)`
-foregroundcolor $foregroundColor1 $writeEmptyLine
## Start script execution
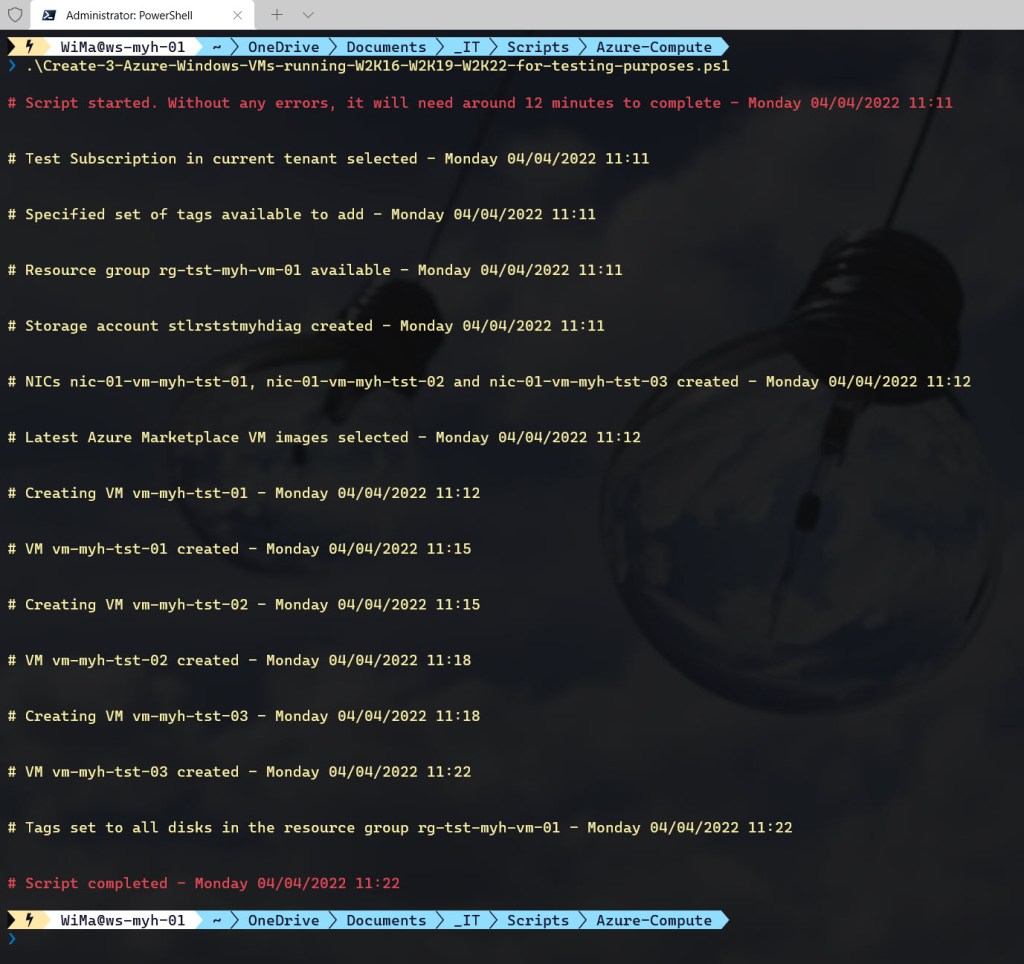
Write-Host ($writeEmptyLine + "# Script started. Without any errors, it will need around 12 minutes to complete" + $writeSeperatorSpaces + $currentTime)`
-foregroundcolor $foregroundColor1 $writeEmptyLine
} else {
$currentPrincipal = New-Object Security.Principal.WindowsPrincipal([Security.Principal.WindowsIdentity]::GetCurrent())
$isAdministrator = $currentPrincipal.IsInRole([Security.Principal.WindowsBuiltInRole]::Administrator)
## Check if running as Administrator, otherwise exit the script
if ($isAdministrator -eq $false) {
Write-Host ($writeEmptyLine + "# Please run PowerShell as Administrator" + $writeSeperatorSpaces + $currentTime)`
-foregroundcolor $foregroundColor1 $writeEmptyLine
Start-Sleep -s 3
exit
}
else {
## If running as Administrator, start script execution
Write-Host ($writeEmptyLine + "# Script started. Without any errors, it will need around 12 minutes to complete" + $writeSeperatorSpaces + $currentTime)`
-foregroundcolor $foregroundColor1 $writeEmptyLine
}
}
## ---------------------------------------------------------------------------------------------------------------------------------------------------------------------------------------------
## Suppress breaking change warning messages
Set-Item Env:\SuppressAzurePowerShellBreakingChangeWarnings "true"
## ---------------------------------------------------------------------------------------------------------------------------------------------------------------------------------------------
## Change the current context to use the test subscription
$subNameTest = Get-AzSubscription | Where-Object {$_.Name -like "*tst*"}
$tenant = Get-AzTenant | Where-Object {$_.Name -like "*$companyShortName*"}
Set-AzContext -TenantId $tenant.TenantId -SubscriptionId $subNameTest.SubscriptionId | Out-Null
Write-Host ($writeEmptyLine + "# Test Subscription in current tenant selected" + $writeSeperatorSpaces + $currentTime)`
-foregroundcolor $foregroundColor2 $writeEmptyLine
## ---------------------------------------------------------------------------------------------------------------------------------------------------------------------------------------------
## Store the specified set of tags in a hash table
$tags = @{$tagSpokeName=$spoke;$tagCostCenterName=$tagCostCenterValue;$tagCriticalityName=$tagCriticalityValue;$tagPurposeName=$tagPurposeValue;$tagEndDateName=$tagEndDateValue}
Write-Host ($writeEmptyLine + "# Specified set of tags available to add" + $writeSeperatorSpaces + $currentTime)`
-foregroundcolor $foregroundColor2 $writeEmptyLine
## ---------------------------------------------------------------------------------------------------------------------------------------------------------------------------------------------
## Create a resource group for the test VMs and all associated resources, if it not already exists
try {
Get-AzResourceGroup -Name $rgVMSpoke -ErrorAction Stop | Out-Null
} catch {
New-AzResourceGroup -Name $rgVMSpoke.ToLower() -Location $location -Force | Out-Null
}
# Set tags resource group
Set-AzResourceGroup -Name $rgVMSpoke -Tag $tags | Out-Null
Write-Host ($writeEmptyLine + "# Resource group $rgVMSpoke available" + $writeSeperatorSpaces + $currentTime)`
-foregroundcolor $foregroundColor2 $writeEmptyLine
## ---------------------------------------------------------------------------------------------------------------------------------------------------------------------------------------------
## Create a storage account for boot diagnostics, if it not exists
try {
Get-AzStorageAccount -ResourceGroupName $rgVMSpoke -Name $bootDiagStorageAccount -ErrorAction Stop | Out-Null
} catch {
New-AzStorageAccount -ResourceGroupName $rgVMSpoke -Name $bootDiagStorageAccount.ToLower() -SkuName $storageSKUNameStandardLRS -Location $location -Kind $storageAccountType `
-AllowBlobPublicAccess $false -MinimumTlsVersion $storageMinimumTlsVersion | Out-Null
}
# Set tags storage account
Set-AzStorageAccount -ResourceGroupName $rgVMSpoke -Name $bootDiagStorageAccount -Tag $tags | Out-Null
Write-Host ($writeEmptyLine + "# Storage account $bootDiagStorageAccount created" + $writeSeperatorSpaces + $currentTime)`
-foregroundcolor $foregroundColor2 $writeEmptyLine
## ---------------------------------------------------------------------------------------------------------------------------------------------------------------------------------------------
## Create the NICs for all VMs, if they don't exist
# Get the VNet to which to connect the NIC
$vnet = Get-AzVirtualNetwork -Name $vnetName -ResourceGroupName $rgNetworkingSpoke
# Get the Subnet ID to which to connect the NIC
$subnetID = (Get-AzVirtualNetworkSubnetConfig -Name $subnetNameVM -VirtualNetwork $vnet).Id
# Create dynamic NIC VM 1
try {
Get-AzNetworkInterface -ResourceGroupName $rgVMSpoke -Name $nicNameVM01 -ErrorAction Stop | Out-Null
} catch {
New-AzNetworkInterface -Name $nicNameVM01.ToLower() -ResourceGroupName $rgVMSpoke -Location $location -SubnetId $subnetID | Out-Null
}
# Store NIC VM 1 in a variable
$nicVM01 = Get-AzNetworkInterface -ResourceGroupName $rgVMSpoke -Name $nicNameVM01
# Set private IP address NIC VM 1 to static
$nicVM01.IpConfigurations[0].PrivateIpAllocationMethod = "Static"
Set-AzNetworkInterface -NetworkInterface $nicVM01 | Out-Null
# Set tags on NIC VM1
$nicVM01.Tag = $tags
Set-AzNetworkInterface -NetworkInterface $nicVM01 | Out-Null
# Create dynamic NIC VM 2
try {
Get-AzNetworkInterface -ResourceGroupName $rgVMSpoke -Name $nicNameVM02 -ErrorAction Stop | Out-Null
} catch {
New-AzNetworkInterface -Name $nicNameVM02.ToLower() -ResourceGroupName $rgVMSpoke -Location $location -SubnetId $subnetID | Out-Null
}
# Store NIC VM 2 in a variable
$nicVM02 = Get-AzNetworkInterface -ResourceGroupName $rgVMSpoke -Name $nicNameVM02
# Set private IP address NIC VM 2 to static
$nicVM02.IpConfigurations[0].PrivateIpAllocationMethod = "Static"
Set-AzNetworkInterface -NetworkInterface $nicVM02 | Out-Null
# Set tags on NIC VM2
$nicVM02.Tag = $tags
Set-AzNetworkInterface -NetworkInterface $nicVM02 | Out-Null
# Create dynamic NIC VM 3
try {
Get-AzNetworkInterface -ResourceGroupName $rgVMSpoke -Name $nicNameVM03 -ErrorAction Stop | Out-Null
} catch {
New-AzNetworkInterface -Name $nicNameVM03.ToLower() -ResourceGroupName $rgVMSpoke -Location $location -SubnetId $subnetID | Out-Null
}
# Store NIC VM 3 in a variable
$nicVM03 = Get-AzNetworkInterface -ResourceGroupName $rgVMSpoke -Name $nicNameVM03
# Set private IP address NIC VM 3 to static
$nicVM03.IpConfigurations[0].PrivateIpAllocationMethod = "Static"
Set-AzNetworkInterface -NetworkInterface $nicVM03 | Out-Null
# Set tags on NIC VM3
$nicVM03.Tag = $tags
Set-AzNetworkInterface -NetworkInterface $nicVM03 | Out-Null
Write-Host ($writeEmptyLine + "# NICs $nicNameVM01, $nicNameVM02 and $nicNameVM03 created" + $writeSeperatorSpaces + $currentTime)`
-foregroundcolor $foregroundColor2 $writeEmptyLine
## ---------------------------------------------------------------------------------------------------------------------------------------------------------------------------------------------
## Specify the local administrator account
$passwordSec = convertto-securestring $password -asplaintext -force
$creds = New-Object System.Management.Automation.PSCredential($userName,$passwordSec)
## ---------------------------------------------------------------------------------------------------------------------------------------------------------------------------------------------
## Get the latest Azure Marketplace VMImage for Windows Server 2016, 2019 and 2022 that match the specified values and store it in a varialbe for later use
$images01 = Get-AzVMImage -Location $location -PublisherName "MicrosoftWindowsServer" -Offer "WindowsServer" -Skus $osSKU01 | Sort-Object -Descending -Property PublishedDate
$images02 = Get-AzVMImage -Location $location -PublisherName "MicrosoftWindowsServer" -Offer "WindowsServer" -Skus $osSKU02 | Sort-Object -Descending -Property PublishedDate
$images03 = Get-AzVMImage -Location $location -PublisherName "MicrosoftWindowsServer" -Offer "WindowsServer" -Skus $osSKU03 | Sort-Object -Descending -Property PublishedDate
Write-Host ($writeEmptyLine + "# Latest Azure Marketplace VM images selected" + $writeSeperatorSpaces + $currentTime)`
-foregroundcolor $foregroundColor2 $writeEmptyLine
## ---------------------------------------------------------------------------------------------------------------------------------------------------------------------------------------------
## Create VM 1 if it not already exists
Write-Host ($writeEmptyLine + "# Creating VM $vmName01" + $writeSeperatorSpaces + $currentTime)`
-foregroundcolor $foregroundColor2 $writeEmptyLine
try {
Get-AzVM -ResourceGroupName $rgVMSpoke -Name $vmName01 -ErrorAction Stop | Out-Null
} catch {
# Create a configurable VM object
$vm01 = New-AzVMConfig -Name $vmName01.ToLower() -VMSize $vmSize
# Add the NIC
Add-AzVMNetworkInterface -VM $vm01 -Id $nicVM01.Id | Out-Null
# Specify the image
Set-AzVMSourceImage -VM $vm01 -PublisherName $images01[0].PublisherName -Offer $images01[0].Offer -Skus $images01[0].Skus -Version $images01[0].Version | Out-Null
# Set OS properties
Set-AzVMOperatingSystem -VM $vm01 -Windows -ProvisionVMAgent -EnableAutoUpdate -Credential $creds -ComputerName $vmName01 | Out-Null
# Set OS disk properties
Set-AzVMOSDisk -VM $vm01 -name $osDiskNameVM01 -CreateOption fromImage -DiskSizeInGB $osDiskSizeInGB -StorageAccountType $diskStorageAccountType -Windows | Out-Null
# Set Data disk properties
$diskConfig = New-AzDiskConfig -Location $location -DiskSizeGB $dataDiskSizeInGB -SkuName $diskStorageAccountType -CreateOption Empty
$dataDisk01 = New-AzDisk -DiskName $dataDiskNameVM01 -Disk $diskConfig -ResourceGroupName $rgVMSpoke
Add-AzVMDataDisk -VM $vm01 -CreateOption Attach -Lun 1 -Caching None -ManagedDiskId $dataDisk01.Id | Out-Null
# Set boot diagnostics properties
Set-AzVMBootDiagnostic -VM $vm01 -Enable -ResourceGroupName $rgVMSpoke -StorageAccountName $bootDiagStorageAccount | Out-Null
# Create VM
New-AzVM -ResourceGroupName $rgVMSpoke -Location $location -VM $vm01 -OSDiskDeleteOption Delete -DataDiskDeleteOption Delete | Out-Null
}
# Set tags on VM1
$vm01 = Get-AzVM -ResourceGroupName $rgVMSpoke -Name $vmName01
Update-AzTag -Tag $tags -ResourceId $vm01.Id -Operation Merge | Out-Null
# Get OS version VM1
$osVersion = $vm01.StorageProfile.ImageReference.Offer + " $($vm01.StorageProfile.ImageReference.Sku)"
# Add OS tag to VM1
$osTag = @{$tagOSVersionName = $osVersion}
Update-AzTag -Tag $osTag -ResourceId $vm01.Id -Operation Merge | Out-Null
Write-Host ($writeEmptyLine + "# VM $vmName01 created" + $writeSeperatorSpaces + $currentTime)`
-foregroundcolor $foregroundColor2 $writeEmptyLine
## ---------------------------------------------------------------------------------------------------------------------------------------------------------------------------------------------
## Create VM 2 if it not already exists
Write-Host ($writeEmptyLine + "# Creating VM $vmName02" + $writeSeperatorSpaces + $currentTime)`
-foregroundcolor $foregroundColor2 $writeEmptyLine
try {
Get-AzVM -ResourceGroupName $rgVMSpoke -Name $vmName02 -ErrorAction Stop | Out-Null
} catch {
# Create a configurable VM object
$vm02 = New-AzVMConfig -Name $vmName02.ToLower() -VMSize $vmSize
# Add the NIC
Add-AzVMNetworkInterface -VM $vm02 -Id $nicVM02.Id | Out-Null
# Specify the image
Set-AzVMSourceImage -VM $vm02 -PublisherName $images02[0].PublisherName -Offer $images02[0].Offer -Skus $images02[0].Skus -Version $images02[0].Version | Out-Null
# Set OS properties
Set-AzVMOperatingSystem -VM $vm02 -Windows -ProvisionVMAgent -EnableAutoUpdate -Credential $creds -ComputerName $vmName02 | Out-Null
# Set OS disk properties
Set-AzVMOSDisk -VM $vm02 -name $osDiskNameVM02 -CreateOption fromImage -DiskSizeInGB $osDiskSizeInGB -StorageAccountType $diskStorageAccountType -Windows | Out-Null
# Set Data disk properties
$diskConfig = New-AzDiskConfig -Location $location -DiskSizeGB $dataDiskSizeInGB -SkuName $diskStorageAccountType -CreateOption Empty
$dataDisk02 = New-AzDisk -DiskName $dataDiskNameVM02 -Disk $diskConfig -ResourceGroupName $rgVMSpoke
Add-AzVMDataDisk -VM $vm02 -CreateOption Attach -Lun 1 -Caching None -ManagedDiskId $dataDisk02.Id | Out-Null
# Set boot diagnostics properties
Set-AzVMBootDiagnostic -VM $vm02 -Enable -ResourceGroupName $rgVMSpoke -StorageAccountName $bootDiagStorageAccount | Out-Null
# Create VM
New-AzVM -ResourceGroupName $rgVMSpoke -Location $location -VM $vm02 -OSDiskDeleteOption Delete -DataDiskDeleteOption Delete | Out-Null
}
# Set tags on VM2
$vm02 = Get-AzVM -ResourceGroupName $rgVMSpoke -Name $vmName02
Update-AzTag -Tag $tags -ResourceId $vm02.Id -Operation Merge | Out-Null
# Get OS version VM2
$osVersion = $vm02.StorageProfile.ImageReference.Offer + " $($vm02.StorageProfile.ImageReference.Sku)"
# Add OS tag to VM2
$osTag = @{$tagOSVersionName = $osVersion}
Update-AzTag -Tag $osTag -ResourceId $vm02.Id -Operation Merge | Out-Null
Write-Host ($writeEmptyLine + "# VM $vmName02 created" + $writeSeperatorSpaces + $currentTime)`
-foregroundcolor $foregroundColor2 $writeEmptyLine
## ---------------------------------------------------------------------------------------------------------------------------------------------------------------------------------------------
## Create VM 3 if it not already exists
Write-Host ($writeEmptyLine + "# Creating VM $vmName03" + $writeSeperatorSpaces + $currentTime)`
-foregroundcolor $foregroundColor2 $writeEmptyLine
try {
Get-AzVM -ResourceGroupName $rgVMSpoke -Name $vmName03 -ErrorAction Stop | Out-Null
} catch {
# Create a configurable VM object
$vm03 = New-AzVMConfig -Name $vmName03.ToLower() -VMSize $vmSize
# Add the NIC
Add-AzVMNetworkInterface -VM $vm03 -Id $nicVM03.Id | Out-Null
# Specify the image
Set-AzVMSourceImage -VM $vm03 -PublisherName $images03[0].PublisherName -Offer $images03[0].Offer -Skus $images03[0].Skus -Version $images03[0].Version | Out-Null
# Set OS properties
Set-AzVMOperatingSystem -VM $vm03 -Windows -ProvisionVMAgent -EnableAutoUpdate -Credential $creds -ComputerName $vmName03 | Out-Null
# Set OS disk properties
Set-AzVMOSDisk -VM $vm03 -name $osDiskNameVM03 -CreateOption fromImage -DiskSizeInGB $osDiskSizeInGB -StorageAccountType $diskStorageAccountType -Windows | Out-Null
# Set Data disk properties
$diskConfig = New-AzDiskConfig -Location $location -DiskSizeGB $dataDiskSizeInGB -SkuName $diskStorageAccountType -CreateOption Empty
$dataDisk03 = New-AzDisk -DiskName $dataDiskNameVM03 -Disk $diskConfig -ResourceGroupName $rgVMSpoke
Add-AzVMDataDisk -CreateOption Attach -Lun 1 -Caching None -VM $vm03 -ManagedDiskId $dataDisk03.Id | Out-Null
# Set boot diagnostics properties
Set-AzVMBootDiagnostic -VM $vm03 -Enable -ResourceGroupName $rgVMSpoke -StorageAccountName $bootDiagStorageAccount | Out-Null
# Create VM
New-AzVM -ResourceGroupName $rgVMSpoke -Location $location -VM $vm03 -OSDiskDeleteOption Delete -DataDiskDeleteOption Delete | Out-Null
}
# Set tags on VM3
$vm03 = Get-AzVM -ResourceGroupName $rgVMSpoke -Name $vmName03
Update-AzTag -Tag $tags -ResourceId $vm03.Id -Operation Merge | Out-Null
# Get OS version VM3
$osVersion = $vm03.StorageProfile.ImageReference.Offer + " $($vm03.StorageProfile.ImageReference.Sku)"
# Add OS tag to VM3
$osTag = @{$tagOSVersionName = $osVersion}
Update-AzTag -Tag $osTag -ResourceId $vm03.Id -Operation Merge | Out-Null
Write-Host ($writeEmptyLine + "# VM $vmName03 created" + $writeSeperatorSpaces + $currentTime)`
-foregroundcolor $foregroundColor2 $writeEmptyLine
## ---------------------------------------------------------------------------------------------------------------------------------------------------------------------------------------------
## Set tags on all disks in the resource group
Get-AzDisk -ResourceGroupName $resourceGroupName -DiskName $diskNames | ForEach-Object {New-AzTag -ResourceId $_.Id -Tag $tags} | Out-Null
Write-Host ($writeEmptyLine + "# Tags set to all disks in the resource group $rgVMSpoke" + $writeSeperatorSpaces + $currentTime)`
-foregroundcolor $foregroundColor2 $writeEmptyLine
## ---------------------------------------------------------------------------------------------------------------------------------------------------------------------------------------------
## Write script completed
Write-Host ($writeEmptyLine + "# Script completed" + $writeSeperatorSpaces + $currentTime)`
-foregroundcolor $foregroundColor1 $writeEmptyLine
## ---------------------------------------------------------------------------------------------------------------------------------------------------------------------------------------------


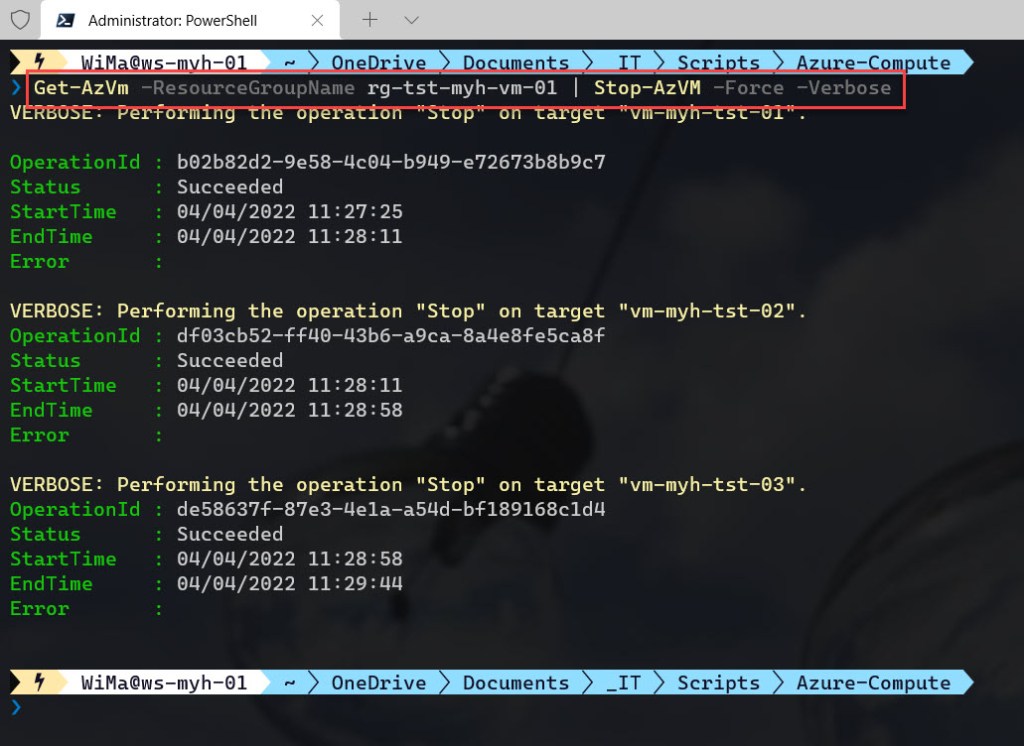
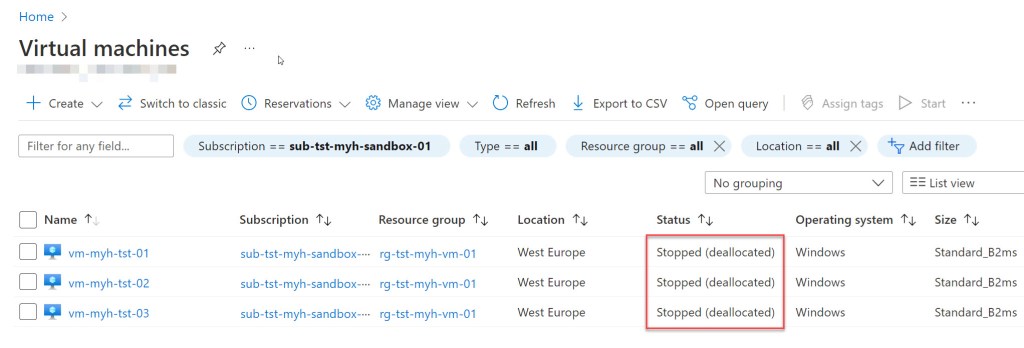
Deallocate all VMs in the resource group
To deallocate all the VMs in the resource group using Azure PowerShell, you need to use the Stop-AzVM command. When you use the -Force parameter, you won’t be prompted for any stop confirmation.
# Deallocate all VMs in a resource group

Get-AzVm -ResourceGroupName <your VM rg here> | Stop-AzVM -Force -Verbose
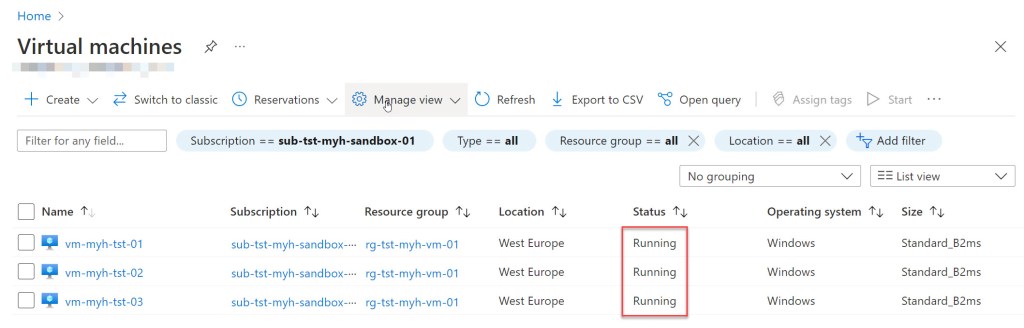
Start all VMs in the resource group
To start all the VMs in the resource group using Azure PowerShell, you need to use the Start-AzVM command.
# Start all VMs in a resource group

Get-AzVm -ResourceGroupName <your VM rg here> | Start-AzVM -Verbose

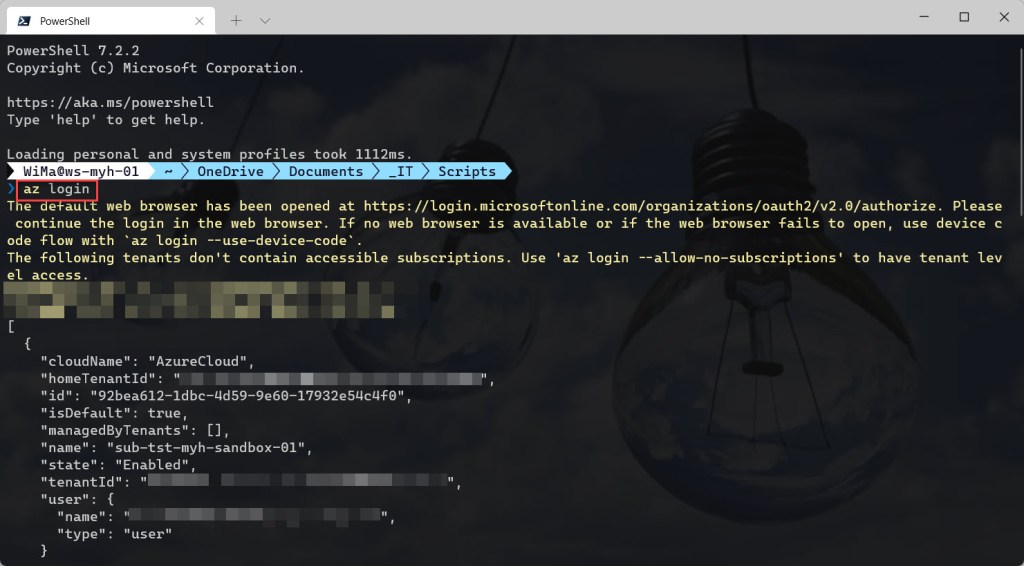
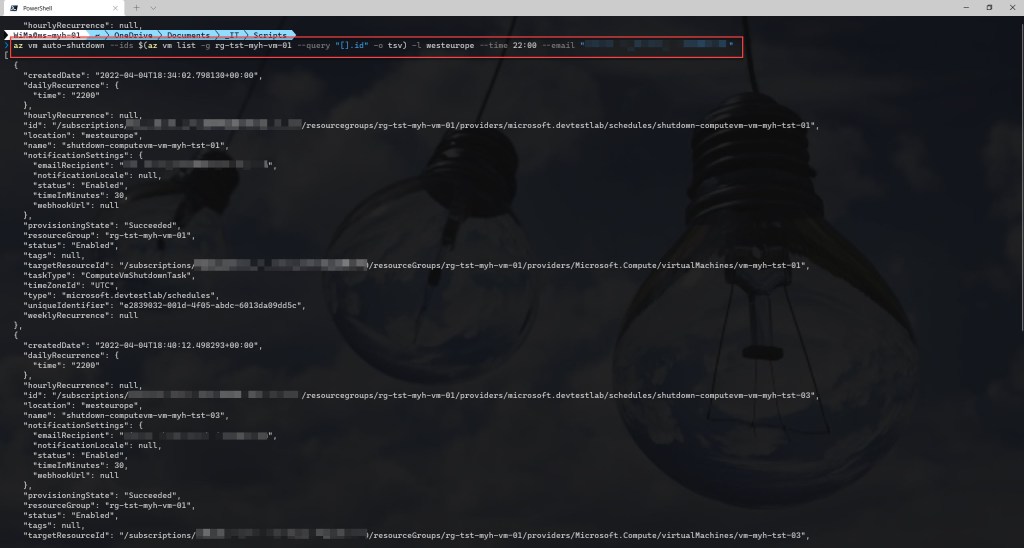
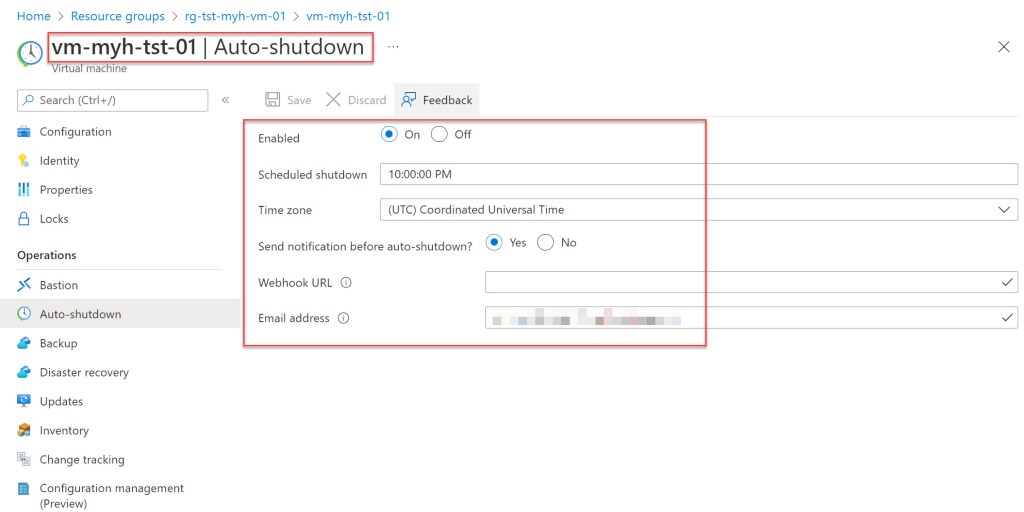
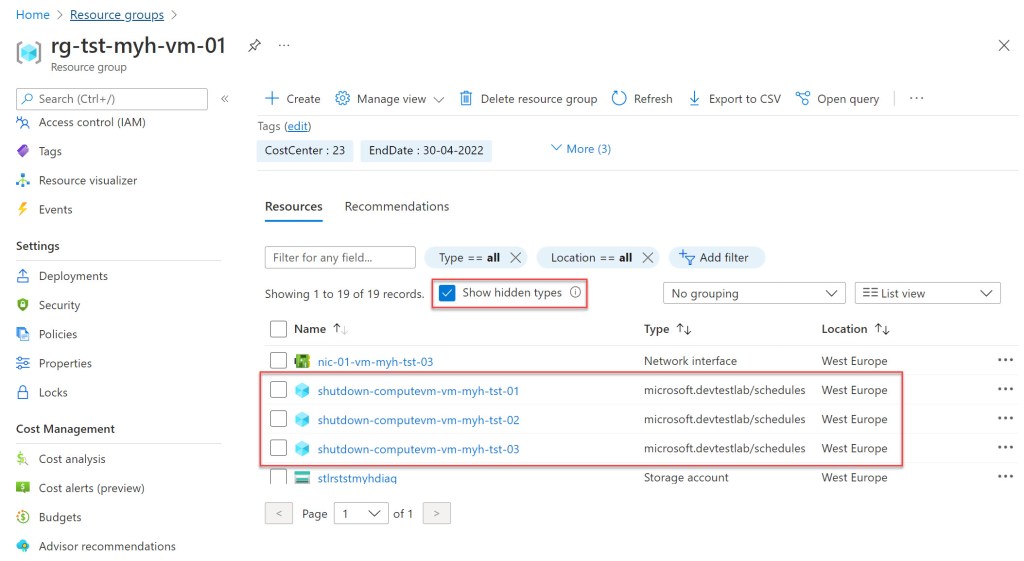
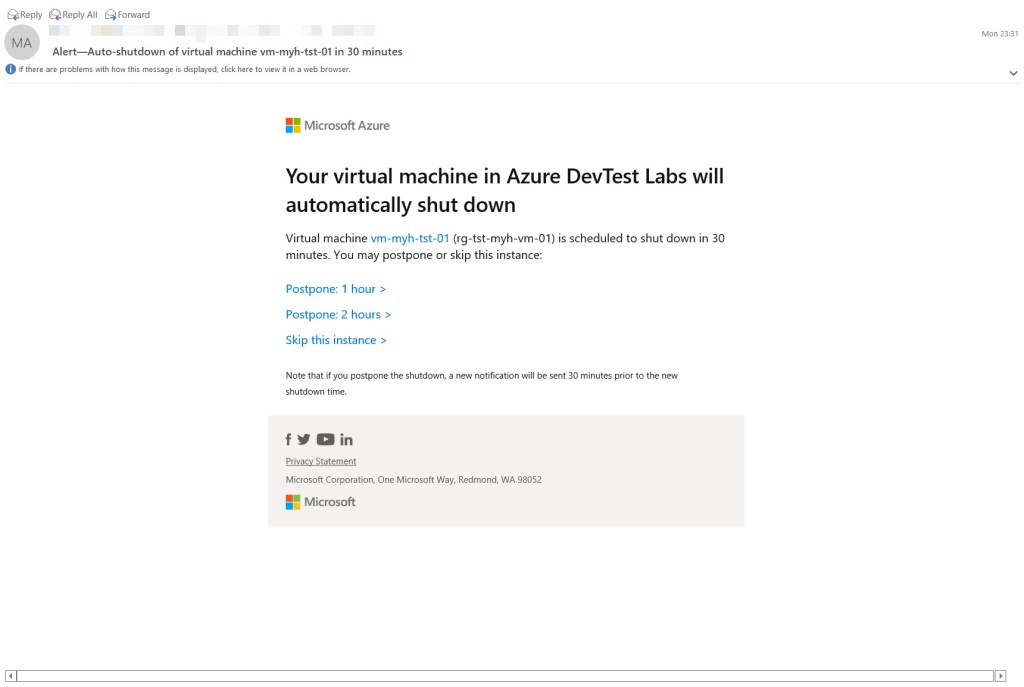
Create an auto-shutdown schedule for all VMs in the resource group (Azure CLI)
To create an auto-shutdown schedule for all VMs in the resource group you can use the Azure CLI command az vm auto-shutdown.
## Azure CLI login

az login

## Create an auto-shutdown schedule for all VMs in a resource group

az vm auto-shutdown --ids $(az vm list -g <your VM rg here> --query "[].id" -o tsv) -l <your location here (same as VM location)> --time 22:00 --email "<your email address here>"

##
Delete resource group
To delete the resource group and all it’s resources using Azure PowerShell, you need to use the Remove-AZResourceGroup command. When you use the -Force parameter, you won’t be prompted for any deletion confirmation.
## Delete resource group

Remove-AzResourceGroup <your VM rg here> -Force -Verbose

I hope this Azure PowerShell script comes in handy whenever you need any Windows VMs for quick testing or to perform a POC in your own Azure environment.
If you have any questions or recommendations about it, feel free to contact me through my Twitter handle (@wmatthyssen) or to just leave a comment.

0 comments on “Azure PowerShell script: Create three Azure Windows VMs running W2K16, W2K19 and W2K22 for testing purposes”