

In this blog post, I will show you how you can setup Azure Cloud Shell with Azure PowerShell.
Azure Cloud Shell is an interactive browser-accessible shell for managing Azure resources with PowerShell or Bash, and this directly from within a browser, Windows Terminal, Visual Studio Code or the Azure Mobile App.
When you start up Azure Cloud Shell for the first time, it will prompt you to create a resource group, storage account, and an Azure Files share, as a one-time process.
To automate and govern the deployment process of all these required resources, I wrote the below Azure PowerShell script which does all of the following:
- Check if the PowerShell window is running as Administrator (which is a requirement), otherwise the Azure PowerShell script will be exited.
- Suppress breaking change warning messages.
- Change the current context to use the management subscription (subscription with *management* in the Subscription name).
- Store a specified set of tags in a hash table.
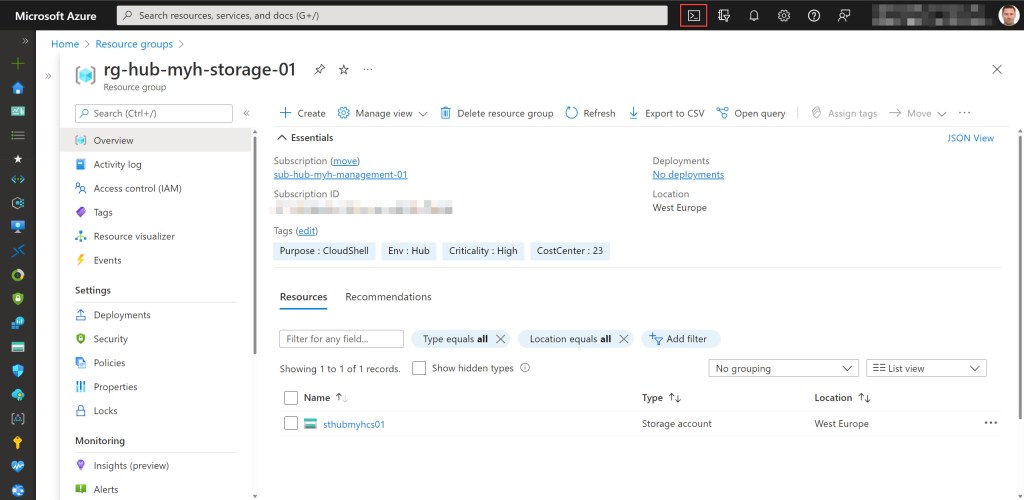
- Create a resource group for the Cloud Shell resources if it not already exists. Also apply the necessary tags to this resource group.
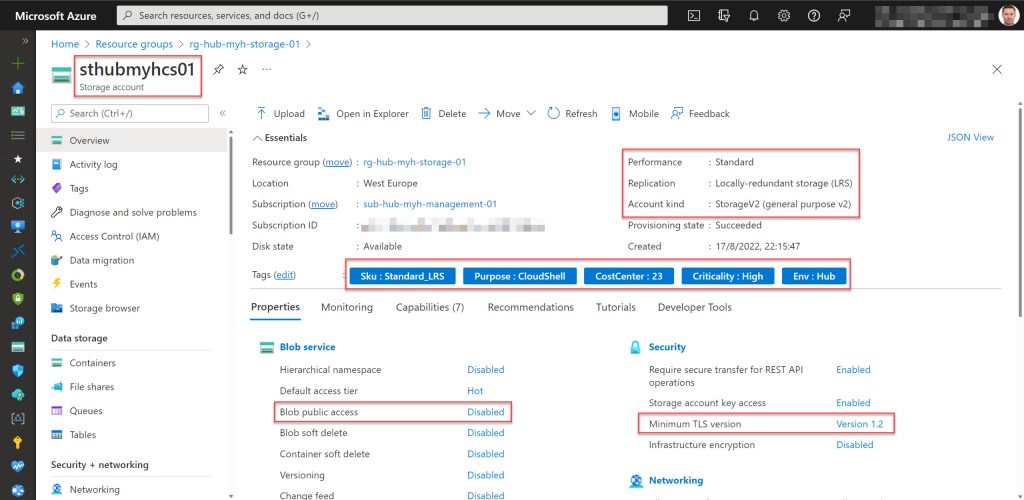
- Create a general purpose v2 storage account for Cloud Shell with specific configuration settings (like minimum TLS version set to 1.2, allow public access set to disabled), if it not already exists. Also apply the necessary tags to this storage account.
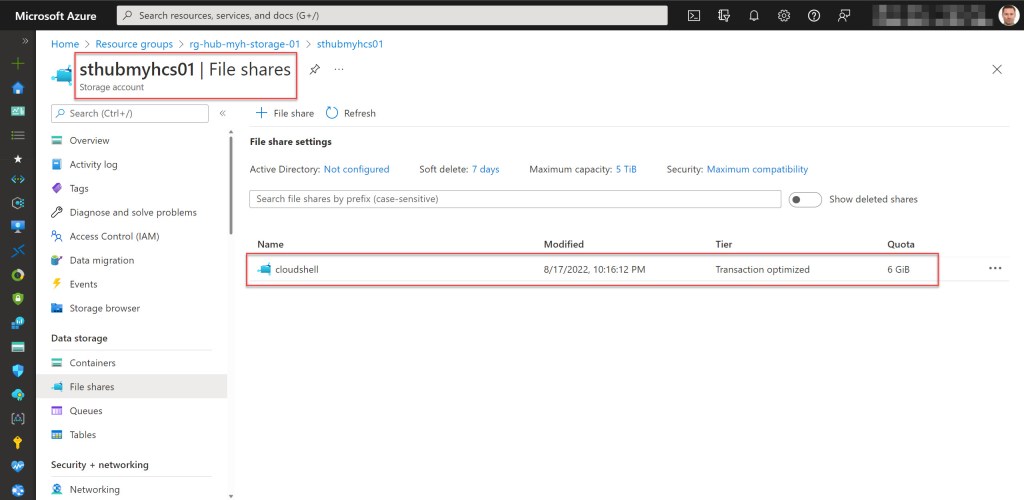
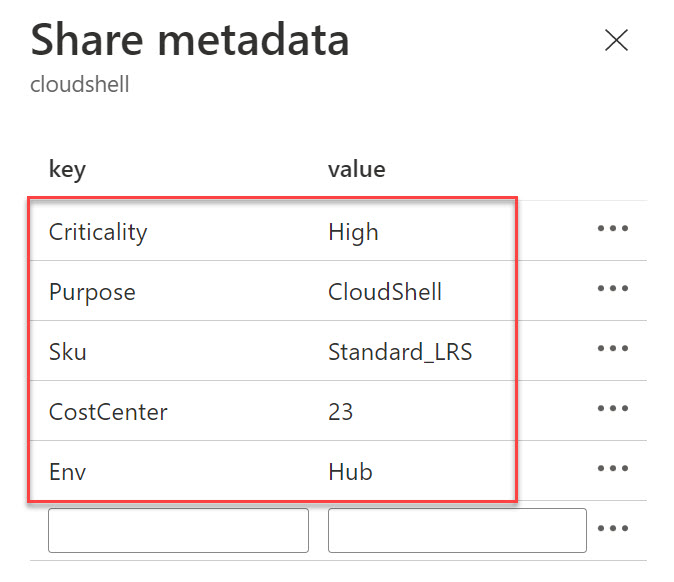
- Create an Azure file share for Cloud Shell with a size of 6 GiB if it not already exists. Also apply the necessary meta data to this file share.
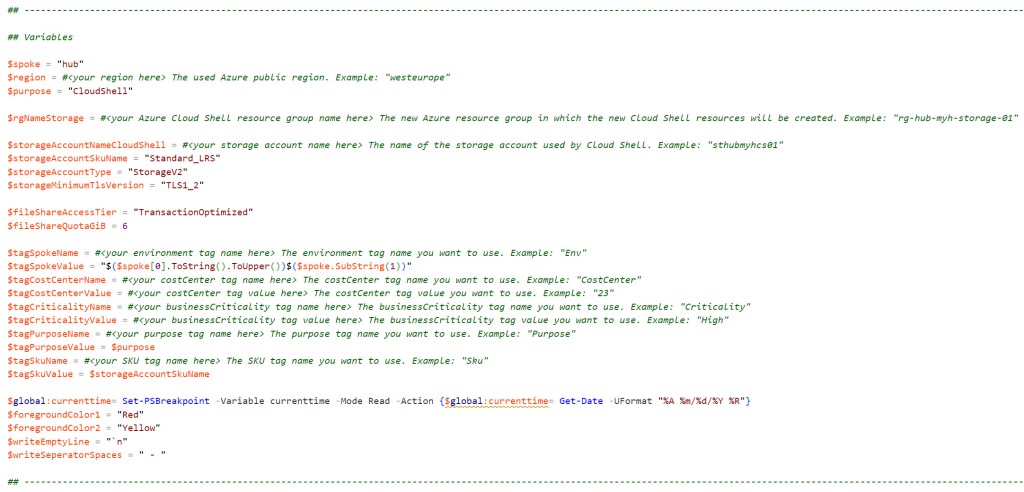
To use the script copy and save it as Setup-Azure-Cloud-Shell.ps1 or download it from GitHub. Then before using the script, adjust all variables to your use (you can find an adjusted example in a screenshot below) and then run the customized script with Administrator privileges from Windows Terminal, Visual Studio Code, or Windows PowerShell.
Prerequisites
- An Azure subscription.
- An Azure Administrator account with the necessary RBAC roles.
- Azure Az PowerShell module which you can install or update using the Install-Module cmdlet: Install-Module -Name Az -Scope CurrentUser -Repository PSGallery -Force
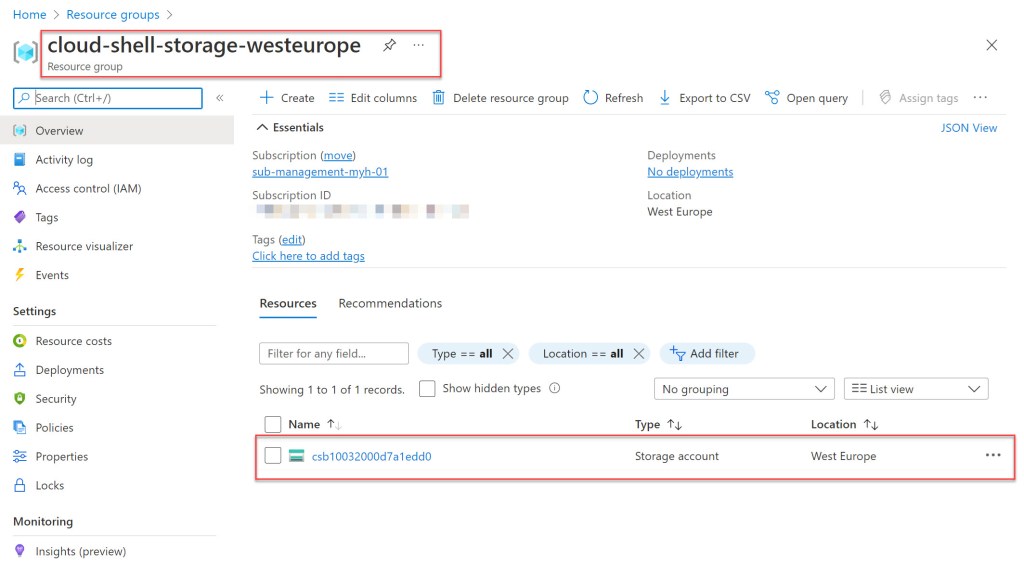
- Clean up previous Azure Cloud Shell deployments. If you used the basic settings while configuring Azure Cloud Shell you should delete the following: Resource Group: cloud-shell-storage-<region>, Storage Account: cs<uniqueGuid>, File Share: cs-<user>-<domain>-com-<uniqueGuid>.
- Change all the variables in the script where needed to fit your needs (you can find an adjusted example in one of the screenshots below)

Azure PowerShell script
Before running the script, sign in with the Connect-AzAccount cmdlet to connect your Azure account or authenticate trough a service principal. Also select the proper tenant with the Set-AzContext -tenantID “xxxxxxxx-xxxx-xxxx-xxxxxxxxxxxx” cmdlet, if you have multiple tenants. You can list all tenants for the current user with the Get-AzTenant cmdlet.
<#
.SYNOPSIS
A script used to setup Cloud Shell for an Azure environment.
.DESCRIPTION
A script used to setup Cloud Shell for an Azure environment.
The script will do all of the following:
Check if the PowerShell window is running as Administrator (when not running from Cloud Shell), otherwise the Azure PowerShell script will be exited.
Suppress breaking change warning messages.
Change the current context to use a management subscription (a subscription with *management* in the subscription name will be automatically selected).
Store a specified set of tags in a hash table.
Create a resource group for the Cloud Shell resources if it not already exists. Also apply the necessary tags to this resource group.
Create a general purpose v2 storage account for Cloud Shell with specific configuration settings (like minimum TLS version set to 1.2, allow public access set to disabled), if it not already exists. Also apply the necessary tags to this storage account.
Create an Azure file share for Cloud Shell with a size of 6 GiB if it not already exists. Also apply the necessary meta data to this file share.
.NOTES
Filename: Setup-Azure-Cloud-Shell.ps1
Created: 30/07/2020
Last modified: 17/08/2022
Author: Wim Matthyssen
Version: 2.0
PowerShell: Azure PowerShell
Requires: PowerShell Az (v5.9.0) Module
Action: Change variables where needed to fit your needs
Disclaimer: This script is provided "As Is" with no warranties
.EXAMPLE
Connect-AzAccount
Get-AzTenant (if not using the default tenant)
Set-AzContext -tenantID "xxxxxxxx-xxxx-xxxx-xxxxxxxxxxxx" (if not using the default tenant)
.\Setup-Azure-Cloud-Shell.ps1
.LINK
https://wmatthyssen.com/2022/02/23/setup-azure-cloud-shell-with-azure-powershell/
#>
## ---------------------------------------------------------------------------------------------------------------------------------------------------------------------------------------------
## Variables
$spoke = "hub"
$region = #<your region here> The used Azure public region. Example: "westeurope"
$purpose = "CloudShell"
$rgNameStorage = #<your Azure Cloud Shell resource group name here> The new Azure resource group in which the new Cloud Shell resources will be created. Example: "rg-hub-myh-storage-01"
$storageAccountNameCloudShell = #<your storage account name here> The name of the storage account used by Cloud Shell. Example: "sthubmyhcs01"
$storageAccountSkuName = "Standard_LRS"
$storageAccountType = "StorageV2"
$storageMinimumTlsVersion = "TLS1_2"
$fileShareAccessTier = "TransactionOptimized"
$fileShareQuotaGiB = 6
$tagSpokeName = #<your environment tag name here> The environment tag name you want to use. Example: "Env"
$tagSpokeValue = "$($spoke[0].ToString().ToUpper())$($spoke.SubString(1))"
$tagCostCenterName = #<your costCenter tag name here> The costCenter tag name you want to use. Example: "CostCenter"
$tagCostCenterValue = #<your costCenter tag value here> The costCenter tag value you want to use. Example: "23"
$tagCriticalityName = #<your businessCriticality tag name here> The businessCriticality tag name you want to use. Example: "Criticality"
$tagCriticalityValue = #<your businessCriticality tag value here> The businessCriticality tag value you want to use. Example: "High"
$tagPurposeName = #<your purpose tag name here> The purpose tag name you want to use. Example: "Purpose"
$tagPurposeValue = $purpose
$tagSkuName = #<your SKU tag name here> The SKU tag name you want to use. Example: "Sku"
$tagSkuValue = $storageAccountSkuName
$global:currenttime= Set-PSBreakpoint -Variable currenttime -Mode Read -Action {$global:currenttime= Get-Date -UFormat "%A %m/%d/%Y %R"}
$foregroundColor1 = "Red"
$foregroundColor2 = "Yellow"
$writeEmptyLine = "`n"
$writeSeperatorSpaces = " - "
## ---------------------------------------------------------------------------------------------------------------------------------------------------------------------------------------------
## Check if PowerShell runs as Administrator, otherwise exit the script
$currentPrincipal = New-Object Security.Principal.WindowsPrincipal([Security.Principal.WindowsIdentity]::GetCurrent())
$isAdministrator = $currentPrincipal.IsInRole([Security.Principal.WindowsBuiltInRole]::Administrator)
## Check if running PowerShell as Administrator, otherwise exit the script
if ($isAdministrator -eq $false) {
Write-Host ($writeEmptyLine + "# Please run PowerShell as Administrator" + $writeSeperatorSpaces + $currentTime)`
-foregroundcolor $foregroundColor1 $writeEmptyLine
Start-Sleep -s 3
exit
} else {
## If running as Administrator, start script execution
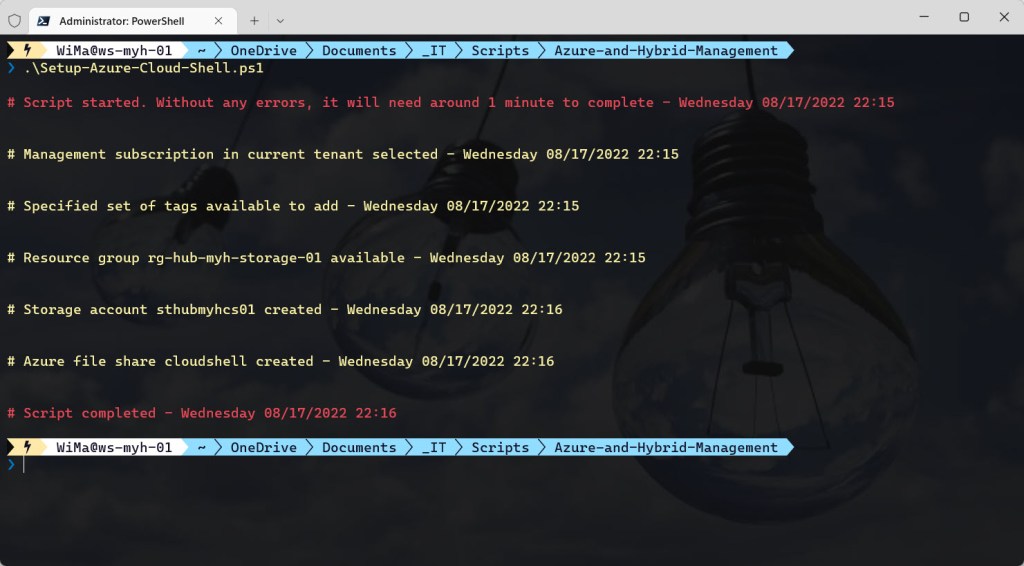
Write-Host ($writeEmptyLine + "# Script started. Without any errors, it will need around 1 minute to complete" + $writeSeperatorSpaces + $currentTime)`
-foregroundcolor $foregroundColor1 $writeEmptyLine
}
## ---------------------------------------------------------------------------------------------------------------------------------------------------------------------------------------------
## Suppress breaking change warning messages
Set-Item Env:\SuppressAzurePowerShellBreakingChangeWarnings "true"
## ---------------------------------------------------------------------------------------------------------------------------------------------------------------------------------------------
## Change the current context to use a management subscription
$subNameManagement = Get-AzSubscription | Where-Object {$_.Name -like "*management*"}
Set-AzContext -SubscriptionId $subNameManagement.SubscriptionId | Out-Null
Write-Host ($writeEmptyLine + "# Management subscription in current tenant selected" + $writeSeperatorSpaces + $currentTime)`
-foregroundcolor $foregroundColor2 $writeEmptyLine
## ---------------------------------------------------------------------------------------------------------------------------------------------------------------------------------------------
## Store the specified set of tags in a hash table
$tags = @{$tagSpokeName=$tagSpokeValue;$tagCostCenterName=$tagCostCenterValue;$tagCriticalityName=$tagCriticalityValue;$tagPurposeName=$tagPurposeValue}
Write-Host ($writeEmptyLine + "# Specified set of tags available to add" + $writeSeperatorSpaces + $currentTime)`
-foregroundcolor $foregroundColor2 $writeEmptyLine
## ---------------------------------------------------------------------------------------------------------------------------------------------------------------------------------------------
## Create a resource group for the Cloud Shell resources if it not already exists. Also apply the necessary tags to this resource group
try {
Get-AzResourceGroup -Name $rgNameStorage -ErrorAction Stop | Out-Null
} catch {
New-AzResourceGroup -Name $rgNameStorage -Location $region -Force | Out-Null
}
# Set tags rg storage
Set-AzResourceGroup -Name $rgNameStorage -Tag $tags | Out-Null
Write-Host ($writeEmptyLine + "# Resource group $rgNameStorage available" + $writeSeperatorSpaces + $currentTime)`
-foregroundcolor $foregroundColor2 $writeEmptyLine
## ---------------------------------------------------------------------------------------------------------------------------------------------------------------------------------------------
## Create a general purpose v2 storage account for Cloud Shell with specific configuration settings, if it not already exists. Also apply the necessary tags to this storage account.
try {
Get-AzStorageAccount -ResourceGroupName $rgNameStorage -Name $storageAccountNameCloudShell -ErrorAction Stop | Out-Null
} catch {
New-AzStorageAccount -ResourceGroupName $rgNameStorage -Name $storageAccountNameCloudShell -SkuName $storageAccountSkuName -Location $region -Kind $storageAccountType `
-AllowBlobPublicAccess $false -MinimumTlsVersion $storageMinimumTlsVersion | Out-Null
}
# Add Sku tag to tags
$tags += @{$tagSkuName=$tagSkuValue}
# Set tags storage account
Set-AzStorageAccount -ResourceGroupName $rgNameStorage -Name $storageAccountNameCloudShell -Tag $tags | Out-Null
Write-Host ($writeEmptyLine + "# Storage account $storageAccountNameCloudShell created" + $writeSeperatorSpaces + $currentTime)`
-foregroundcolor $foregroundColor2 $writeEmptyLine
## ---------------------------------------------------------------------------------------------------------------------------------------------------------------------------------------------
## Create an Azure file share for Cloud Shell if it does not exist. Also apply the necessary meta data to this file share
$fileShareName = "$($purpose.ToString().ToLower())"
try {
Get-AzRmStorageShare -ResourceGroupName $rgNameStorage -StorageAccountName $storageAccountNameCloudShell -Name $fileShareName -ErrorAction Stop | Out-Null
} catch {
New-AzRmStorageShare -ResourceGroupName $rgNameStorage -StorageAccountName $storageAccountNameCloudShell -Name $fileShareName -AccessTier $fileShareAccessTier `
-QuotaGiB $fileShareQuotaGiB | Out-Null
}
# Set Metadata file share
Update-AzRmStorageShare -ResourceGroupName $rgNameStorage -StorageAccountName $storageAccountNameCloudShell -Name $fileShareName -Metadata $tags | Out-Null
Write-Host ($writeEmptyLine + "# Azure file share $fileShareName created" + $writeSeperatorSpaces + $currentTime)`
-foregroundcolor $foregroundColor2 $writeEmptyLine
## ---------------------------------------------------------------------------------------------------------------------------------------------------------------------------------------------
## Write script completed
Write-Host ($writeEmptyLine + "# Script completed" + $writeSeperatorSpaces + $currentTime)`
-foregroundcolor $foregroundColor1 $writeEmptyLine
## ---------------------------------------------------------------------------------------------------------------------------------------------------------------------------------------------

Azure Portal
When you have run the script, there is a just a final step you need to do before you can start using Azure Cloud Shell with the existing resources.
Logon to the Azure Portal and click on the Cloud Shell icon, which then will open a new frame at the bottom of the screen.
Azure should now recognize that you do not have any storage mounted and will prompt you to create a new storage account (of course only if you cleaned up previous Azure Cloud Shell deployments).
Select Show advanced settings in order to be able to configure these properties yourself.

In the opened screen (blade), select the Subscription (management subscription) and the Cloud Shell region. Next, under Resource group select Use existing and select the correct resource group. Also repeat this for the Storage account. For the File Share you should also choose Use existing, but then you need to type in the Azure File Share name, which is cloudshell in our case. When all fields are selected, click Attach storage to continue.

Once everything is configured, which doesn’t take that long, the Cloud Shell session will start up, and you can start using it.

If you want to use Cloud Shell in a full screen mode, you can open a new tab in your browser and type in https://shell.azure.com (you can also directly access cloud shell via this link).

If you are interested, you can also read my previous blog post on how you can “Upload and run an Azure PowerShell script from your clouddrive in Azure Cloud Shell”
Conclusion
Azure Cloud Shell offers a browser-based, cross-platform experience which gives you access to powerful tools to manage your Azure resources. When you use Azure Cloud Shell for the first time, it will prompt you to create a resource group, storage account, and an Azure Files share, as a one-time process.
In this blog post I showed you how you can automate and govern this Azure Cloud Shell setup process with the use of Azure PowerShell. If you have any questions or recommendations about it, feel free to contact me through my Twitter handle (@wmatthyssen) or to just leave a comment.

Pingback: Upload and run an Azure PowerShell script from your clouddrive in Azure Cloud Shell – Wim Matthyssen