
[January 16, 2022 – reviewed & updated]
Not that lang ago, I wrote a PowerShell script to install the Windows Sysinternals tool BgInfo on a Windows Server 2016, 2019 or 2022 in an automated way. More information about that script can be found over here.
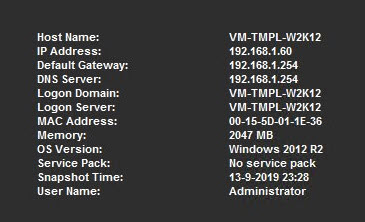
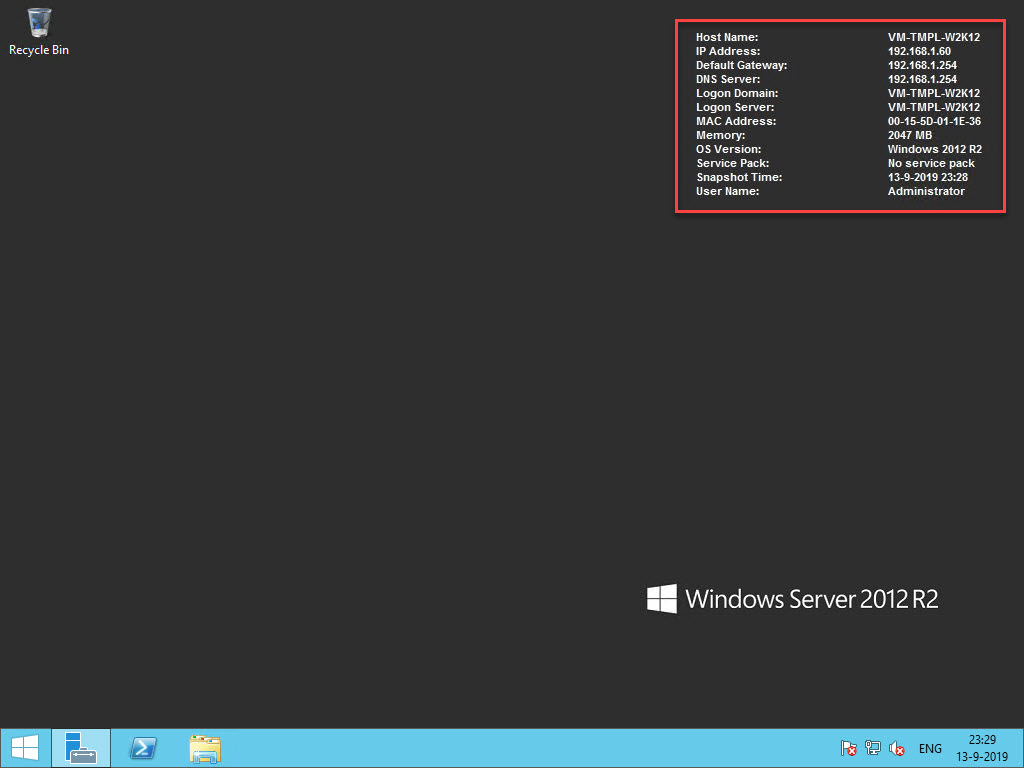
For those who don’t know, this free tool comes in handy whenever you want to show relevant data like, DNS settings, used IP Addresses or computer name, directly on the desktop of a server or workstation.
Whenever I create a new Virtual Machine (VM) template for customers, I mostly add this tool in the base image (also called golden image) and set it so it starts up automatically whenever a user logs on to the server.
Because Windows Server 2012 R2 uses PowerShell 4.0, I also wrote a PowerShell script to automate the installation and configuration process on this server OS.
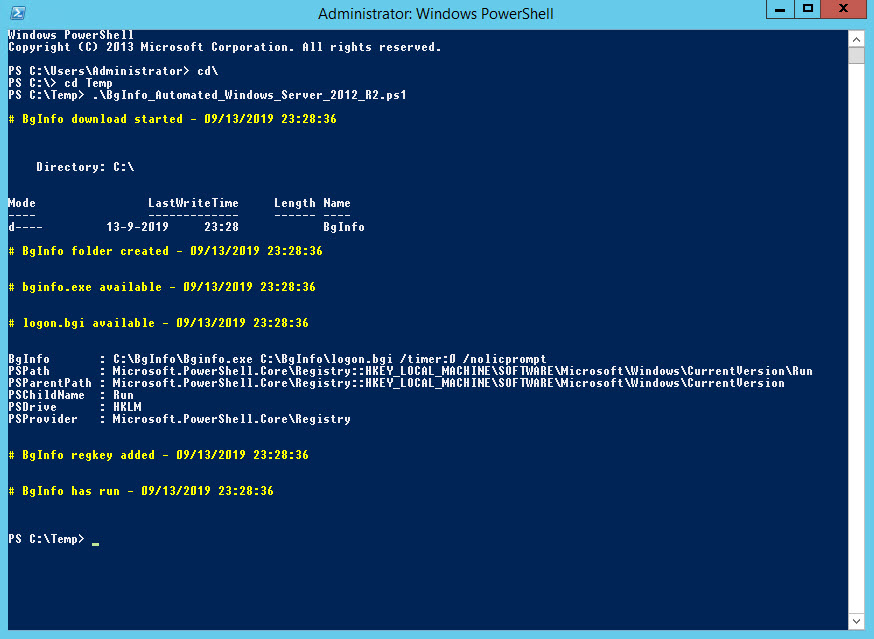
This PowerShell script will do all of the following:
- Create the BgInfo folder on the C drive if the folder does not already exist.
- Download the latest BgInfo tool from the Sysinternals webpage..
- Extract and cleanup the BgInfo.zip file.
- Download the logon.bgi file which holds the preferred settings.
- Extract and cleanup the LogonBgi.zip file in the BgInfo folder.
- Create the registry key (regkey) to AutoStart the BgInfo tool in combination with the logon.bgi config file.
- Start BgInfo for the first time.
- Exit the PowerShell window upon completion.
To use the script copy and save it as Deploy-BgInfo-WS2012-R2.ps1 or download it from GitHub. Leave the variables like they are, or if desired, adjust them to your use. Then run the (customized) script with Administrator privileges from Windows PowerShell from the server you wish to use for your VM template or from any other server you want to use BgInfo on.
Prerequisites
- OS: Windows Server 2012 R2
- PowerShell: Windows PowerShell 4.0
- Other: Internet connectivity
PowerShell Script
<#
.SYNOPSIS

A script used to download, install and configure the latest BgInfo version on a Windows Server 2012 R2.

.DESCRIPTION

A script used to download, install and configure the latest BgInfo version (v4.28) on a Windows Server 2012 R2.
The BgInfo folder will be created on the C: drive if the folder does not already exist.
Then the latest BgInfo.zip file will be downloaded and extracted in the BgInfo folder.
The LogonBgi.zip file which holds the preferred settings will also be downloaded and extracted to the BgInfo folder.
After extraction both .zip files will be deleted.
A registry key (regkey) to AutoStart the BgInfo tool in combination with the logon.bgi config file will be created.
At the end of the script BgInfo will be started for the first time and the PowerShell window will be closed.

.NOTES

File Name:      Deploy-BgInfo-WS2012-R2.ps1
Created:        17/09/2018
Last modified:  16/01/2022
Author:         Wim Matthyssen
PowerShell:     4.0 or above
Requires:       -RunAsAdministrator
OS:             Windows Server 2012 R2
Version:        2.0
Action:         Change variables were needed to fit your needs
Disclaimer:     This script is provided "As Is" with no warranties.

.EXAMPLE

.\Deploy-BgInfo-WS2012-R2.ps1

.LINK

https://wmatthyssen.com/2019/09/11/powershell-bginfo-automation-script-for-windows-server-2012-r2/
#>

## ----------------------------------------------------------------------------------------------------------------------------------------------------------------------------------

## Variables

$bgInfoFolder = "C:\BgInfo"
$bgInfoFolderContent = $bgInfoFolder + "\*"
$itemType = "Directory"
$bgInfoUrl = "https://download.sysinternals.com/files/BGInfo.zip"
$bgInfoZip = "C:\BgInfo\BgInfo.zip"
$bgInfoEula = "C:\BgInfo\Eula.txt"
$logonBgiUrl = "https://tinyurl.com/yxlxbgun"
$logonBgiZip = "C:\BgInfo\LogonBgi.zip"
$bgInfoRegPath = "HKLM:\SOFTWARE\Microsoft\Windows\CurrentVersion\Run"
$bgInfoRegkey = "BgInfo"
$bgInfoRegType = "String"
$bgInfoRegkeyValue = "C:\BgInfo\Bginfo.exe C:\BgInfo\logon.bgi /timer:0 /nolicprompt"
$regKeyExists = (Get-Item $bgInfoRegPath -EA Ignore).Property -contains $bgInfoRegkey

$foregroundColor1 = "Red"
$foregroundColor2 = "Yellow"
$writeEmptyLine = "`n"

## ----------------------------------------------------------------------------------------------------------------------------------------------------------------------------------

## Start script execution

Write-Host ($writeEmptyLine + "# BgInfo deployment script started")`
-foregroundcolor $foregroundColor1 $writeEmptyLine

## ----------------------------------------------------------------------------------------------------------------------------------------------------------------------------------

## Create BgInfo folder on C: if it not exists, else delete it's content

If (!(Test-Path -Path $bgInfoFolder))
{
       New-Item -ItemType $itemType -Force -Path $bgInfoFolder
       Write-Host ($writeEmptyLine + "# BgInfo folder created")`
       -foregroundcolor $foregroundColor2 $writeEmptyLine
}
Else
{
       Write-Host ($writeEmptyLine + "# BgInfo folder already exists")`
       -foregroundcolor $foregroundColor2 $writeEmptyLine
       Remove-Item $bgInfoFolderContent -Force -Recurse -ErrorAction SilentlyContinue
       Write-Host ($writeEmptyLine + "# Content existing BgInfo folder deleted")`
       -foregroundcolor $foregroundColor2 $writeEmptyLine
}

## ----------------------------------------------------------------------------------------------------------------------------------------------------------------------------------

## Download, save and extract latest BgInfo software to C:\BgInfo

Import-Module BitsTransfer
Start-BitsTransfer -Source $bgInfoUrl -Destination $bgInfoZip
[System.Reflection.Assembly]::LoadWithPartialName("System.IO.Compression.FileSystem") | Out-Null
[System.IO.Compression.ZipFile]::ExtractToDirectory($bgInfoZip, $bgInfoFolder)
Remove-Item $bgInfoZip
Remove-Item $bgInfoEula

Write-Host ($writeEmptyLine + "# bginfo.exe available")`
-foregroundcolor $foregroundColor2 $writeEmptyLine

## ----------------------------------------------------------------------------------------------------------------------------------------------------------------------------------

## Download, save and extract logon.bgi file to C:\BgInfo

Invoke-WebRequest -Uri $logonBgiUrl -OutFile $logonBgiZip
[System.Reflection.Assembly]::LoadWithPartialName("System.IO.Compression.FileSystem") | Out-Null
[System.IO.Compression.ZipFile]::ExtractToDirectory($logonBgiZip, $bgInfoFolder)
Remove-Item $logonBgiZip

Write-Host ($writeEmptyLine + "# logon.bgi available")`
-foregroundcolor $foregroundColor2 $writeEmptyLine

## ----------------------------------------------------------------------------------------------------------------------------------------------------------------------------------

## Create BgInfo Registry Key to AutoStart

If ($regKeyExists -eq $True)
{
   Write-Host ($writeEmptyLine + "# BgInfo regkey exists, script wil go on")`
   -foregroundcolor $foregroundColor1 $writeEmptyLine
}
Else
{
   New-ItemProperty -Path $bgInfoRegPath -Name $bgInfoRegkey -PropertyType $bgInfoRegType -Value $bgInfoRegkeyValue

   Write-Host ($writeEmptyLine + "# BgInfo regkey added")`
   -foregroundcolor $foregroundColor2 $writeEmptyLine
}

## ----------------------------------------------------------------------------------------------------------------------------------------------------------------------------------

## Run BgInfo

C:\BgInfo\Bginfo.exe C:\BgInfo\logon.bgi /timer:0 /nolicprompt

Write-Host ($writeEmptyLine + "# BgInfo has ran for the first time")`
-foregroundcolor $foregroundColor2 $writeEmptyLine

## ----------------------------------------------------------------------------------------------------------------------------------------------------------------------------------

## Exit PowerShell window 3 seconds after completion

Write-Host ($writeEmptyLine + "# Script completed, the PowerShell window will close in 3 seconds")`
-foregroundcolor $foregroundColor1 $writeEmptyLine
Start-Sleep 3
stop-process -Id $PID

## ----------------------------------------------------------------------------------------------------------------------------------------------------------------------------------

Customize logon.bgi
If you want to change any configuration setting (for example the font style or published info), just open the logon.bgi file and adjust the settings to your preferences. Click OK to save and set the new settings.


I hope this PowerShell script comes in handy for you whenever you want to use BgInfo on a Windows 2012 R2 server or when you create a Windows 2012 R2 VM template.
If you have any questions or recommendations about it, feel free to contact me through my Twitter handle (@wmatthyssen) or to just leave a comment.

Pingback: #LinksOfTheWeek n°10 : BgInfo, Centreon, support premium Mozilla, etc. | | #LinksOfTheWeek | IT-Connect
Hi Wim,
Thanks for this script! Very useful for labs.
There is a mistake on the blog version, line 31, “#>” instead of “#>”.
LikeLike
Pingback: Newsletter: September 28, 2019 – Notes from MWhite
Pingback: PowerShell: BgInfo deployment script for Windows Server 2016, 2019 and 2022 (preview) – Wim Matthyssen
BGInfo is misreporting Server 2022 as server 2016 for the OS Version. How have you dealt with this?
LikeLike
Yes indeed, at het moment BgInfo v4.28 reports Windows Server 2022 as Windows Server 2016. This will hopefully be fixed by Microsoft in a new release. But in the meantime you can use the following workaround: https://t.co/n93TpsO38M
LikeLike