
This blog post will demonstrate how to use an Azure PowerShell script to create an Azure storage account to host a static website within a specific subscription.
These days, websites come in various shapes, colors, and sizes, and one way they can differ is based on whether they are static or dynamic.
A static website relies on server-side rendering to display pre-built HTML, CSS, and JavaScript files to a user’s web browser. In this case, each file represents a physical page on the website. On the other hand, a dynamic website uses a different approach and renders webpages upon request when a user visits a page by using server technologies such as PHP.
Another difference between static and dynamic websites is that static websites always appear the same to every user and only change when a developer modifies the source files, while dynamic websites can present different types of information to various visitors.
The choice between a static or dynamic website largely depends on the purpose of the site you’re building. Dynamic websites may require more time and effort for initial coding and development, making them more costly to build. So, if you’re working with a tight timeline and budget, a static site might be a more suitable option.
Another good use case where a static website can be more beneficial is when, for instance, you need a website for a limited-time promotion that only requires one to three pages and which will be taken down after the promotion ends.
To host a static website in your Azure environment, you have multiple options. Firstly, you can set up an Azure virtual machine (VM) or container, either as an Azure Container Instance (ACI) or running on the Azure Kubernetes Service (AKS). Alternatively, you can utilize the Azure App Service or Azure Static Web Apps.
But as shown in this blog post, Azure Storage offers another way to host static websites because it provides a built-in feature that allows you to directly host static websites from a general-purpose v2 storage account. The process to set it up is straightforward; all you need to do is create a storage account, enable the static website feature, and upload your HTML, CSS, or other static assets.
But to automate the deployment process, I wrote the following Azure PowerShell script, which includes the following steps and configurations:
- Remove the breaking change warning messages.
- Change the current context to use a management subscription holding your central Log Analytics workspace.
- Save the Log Analytics workspace from the management subscription as a variable.
- Change the current context to the specified subscription.
- Store a specified set of tags in a hash table.
- Create a resource group for the storage account if it does not already exist. Also, apply the necessary tags to this resource group.
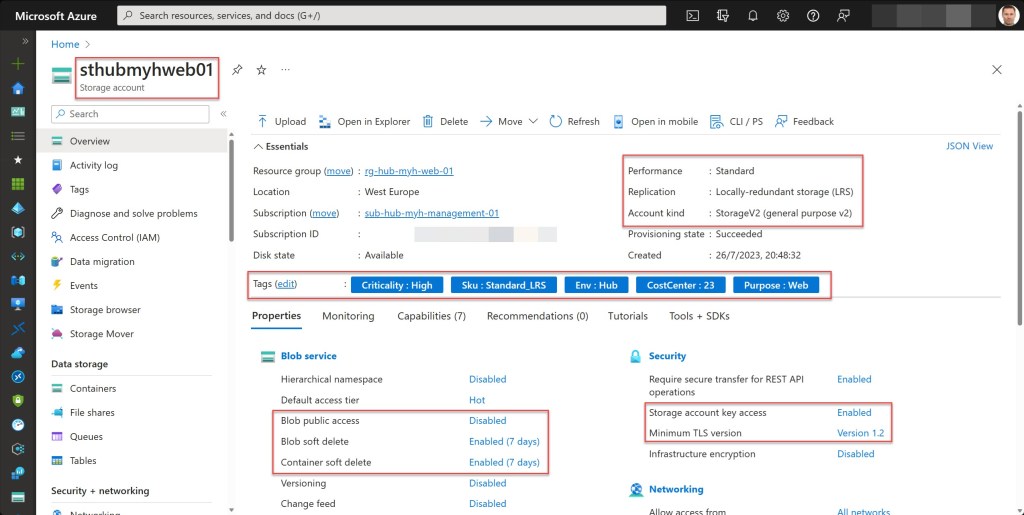
- Create a general-purpose v2 storage account with specific configuration settings if it does not already exist; otherwise, exit the script. Also, apply the necessary tags to this storage account.
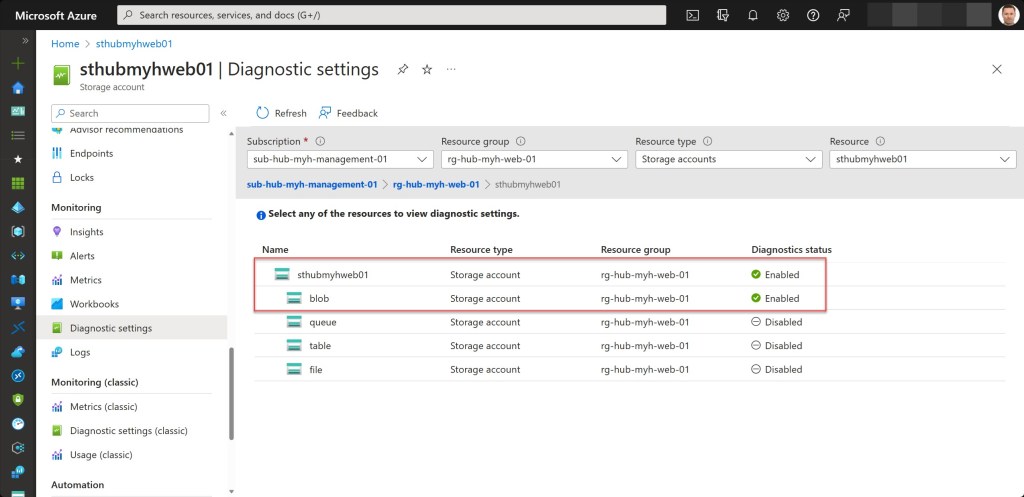
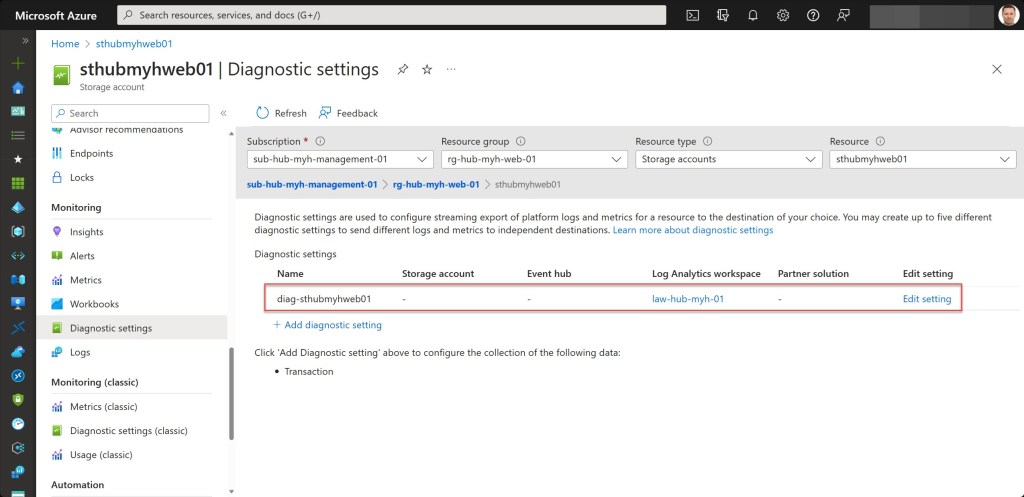
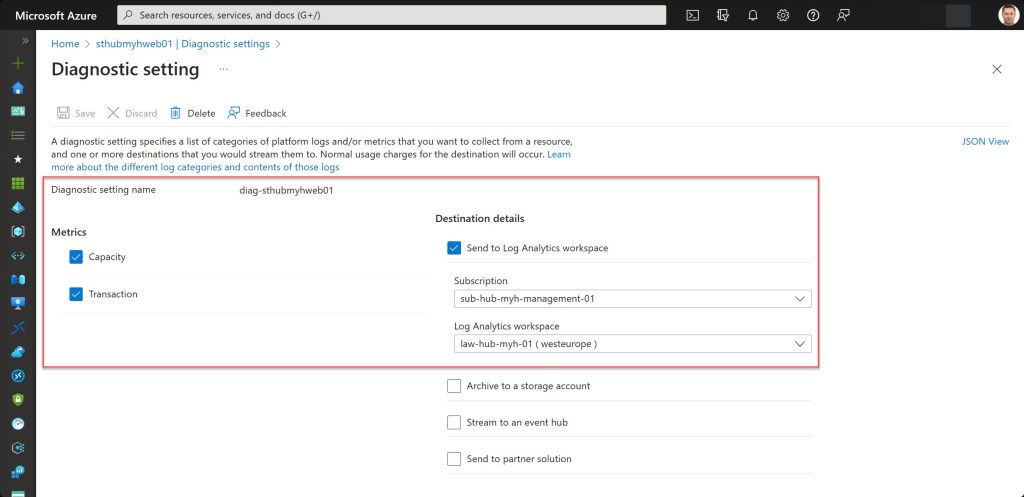
- Set the log and metrics settings for the storage account resource if they don’t exist.
- Enable blob soft delete.
- Enable container soft delete.
- Enable static website hosting.
- Modify the storage account to set blob public access to disabled.
- Lock the resource group with a CanNotDelete lock.
To use the script, copy and save it as Create-Azure-Blob-Storage-static-website.ps1 or download it from GitHub. Then, before using the script, adjust all variables to your needs, and then run the customized script from Windows Terminal, Visual Studio Code, or Windows PowerShell. Or you can simply run it from Cloud Shell.
Prerequisites
- An Azure subscription (preferably more than one if you want to follow the Enterprise-Scale architecture).
- An Azure Administrator account with the necessary RBAC roles.
- An existing Log Analytics workspace.
- Version 10.0.0 of the Azure Az PowerShell module is required.
- Change all the variables in the script where needed to fit your needs (you can find an adjusted example in one of the screenshots below).

Azure PowerShell script
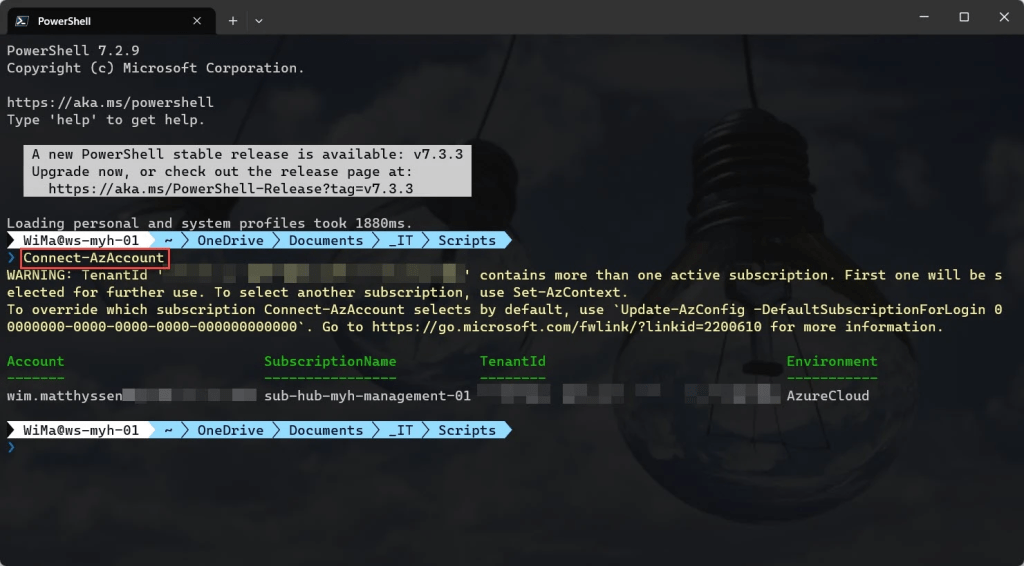
If you are not running the script from Cloud Shell, don’t forget to sign in with the Connect-AzAccount cmdlet to connect your Azure account.
You can then run the script with the required parameters:
.\Create-Azure-Blob-Storage-static-website -SubscriptionName <"your Azure subscription name here"> -Spoke <"your spoke name here">

<#
.SYNOPSIS
A script used to create an Azure Blob Storage with static website hosting enabled.
.DESCRIPTION
A script used to create an Azure Blob Storage with static website hosting enabled.
This script will do all of the following:
Remove the breaking change warning messages.
Change the current context to use a management subscription holding your central Log Analytics workspace.
Save the Log Analytics workspace from the management subscription as a variable.
Change the current context to the specified subscription.
Store a specified set of tags in a hash table.
Create a resource group for the storage account if it does not already exist. Also, apply the necessary tags to this resource group.
Create a general-purpose v2 storage account if it does not already exist; otherwise, exit the script. Also, apply the necessary tags to this storage account.
Set the log and metrics settings for the storage account and blob resource if they don't exist.
Enable blob soft delete.
Enable container soft delete.
Enable static website hosting.
Modify the storage account to set blob public access to disabled.
Lock the storage account resource group with a CanNotDelete lock.
.NOTES
Filename: Create-Azure-Blob-Storage-static-website.ps1
Created: 10/07/2023
Last modified: 10/07/2023
Author: Wim Matthyssen
Version: 1.0
PowerShell: Azure PowerShell and Azure Cloud Shell
Requires: PowerShell Az (v10.0.0)
Action: Change variables were needed to fit your needs.
Disclaimer: This script is provided "as is" with no warranties.
.EXAMPLE
Connect-AzAccount
Get-AzTenant (if not using the default tenant)
Set-AzContext -tenantID "xxxxxxxx-xxxx-xxxx-xxxxxxxxxxxx" (if not using the default tenant)
.\Create-Azure-Blob-Storage-static-website -SubscriptionName <"your Azure subscription name here"> -Spoke <"your spoke name here">
-> .\Create-Azure-Blob-Storage-static-website -SubscriptionName sub-hub-myh-management-01 -Spoke hub
.LINK
https://wmatthyssen.com/2023/07/11/create-an-azure-storage-account-to-host-a-static-website-within-a-specified-subscription-using-an-azure-powershell-script/
#>
## ---------------------------------------------------------------------------------------------------------------------------------------------------------------------------------------------
## Parameters
param(
# $subscriptionName -> Name of the Azure Subscription
[parameter(Mandatory = $true)][ValidateNotNullOrEmpty()] [string] $subscriptionName,
# $spoke -> Name of the spoke
[parameter(Mandatory = $true)][ValidateNotNullOrEmpty()] [string] $spoke
)
## ---------------------------------------------------------------------------------------------------------------------------------------------------------------------------------------------
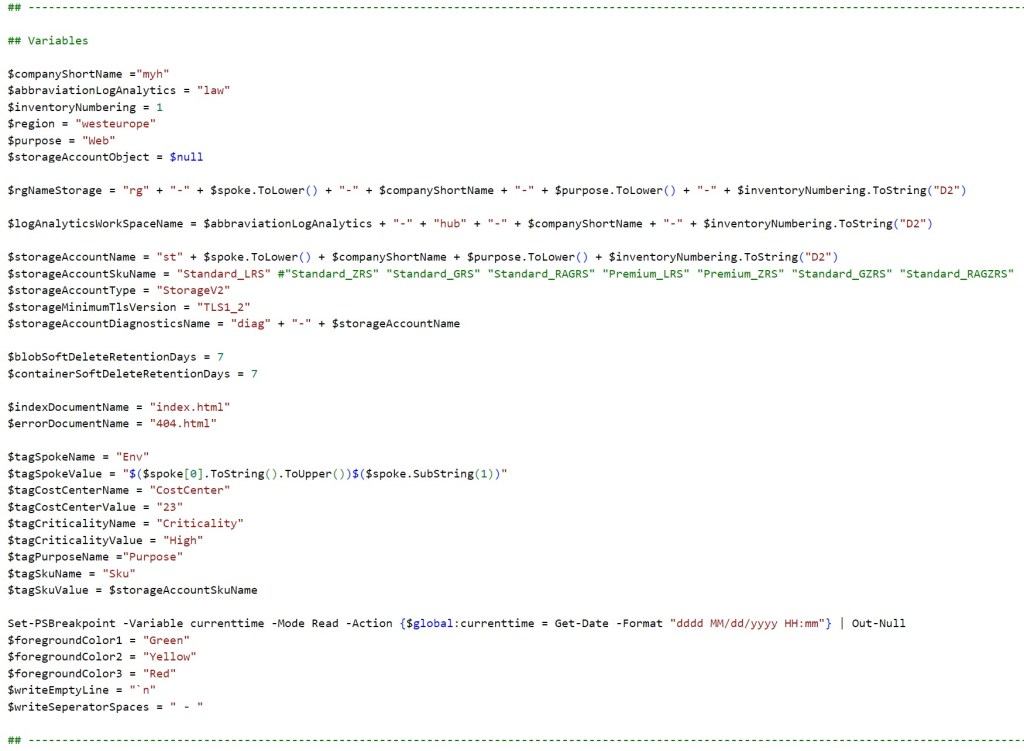
## Variables
$region = #<your region here> The used Azure public region. Example: "westeurope"
$purpose = "Web"
$storageAccountObject = $null
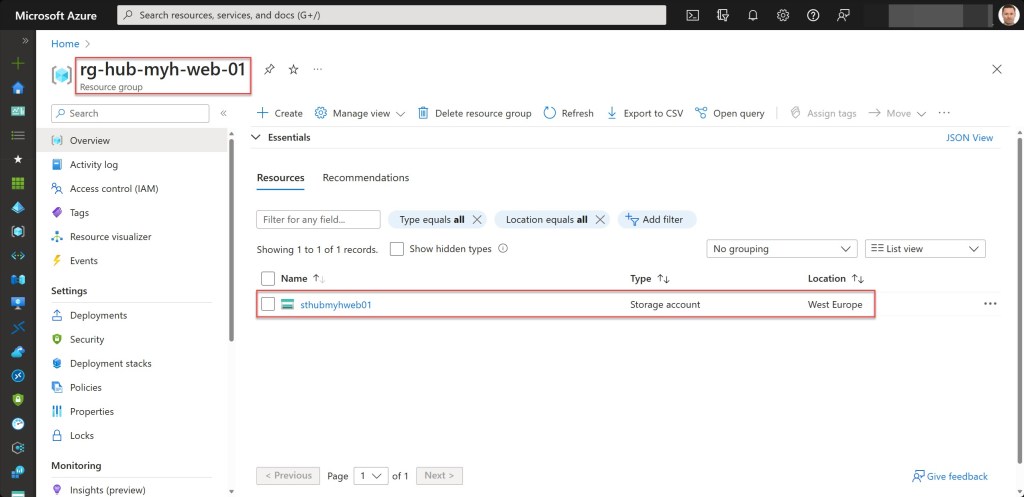
$rgNameStorage = #<your storage account resource group name here> The name of the Azure resource group in which your storage account will be deployed. Example: "rg-hub-myh-web-01"
$logAnalyticsWorkSpaceName = #<your Log Analytics workspace name here> The name of your existing Log Analytics workspace. Example: "law-hub-myh-01"
$storageAccountName = #<your storage account name here> The name of your new storage account. Example: "sthubmyweb01"
$storageAccountSkuName = "Standard_LRS" #"Standard_ZRS" "Standard_GRS" "Standard_RAGRS" "Premium_LRS" "Premium_ZRS" "Standard_GZRS" "Standard_RAGZRS"
$storageAccountType = "StorageV2"
$storageMinimumTlsVersion = "TLS1_2"
$storageAccountDiagnosticsName = "diag" + "-" + $storageAccountName
$blobSoftDeleteRetentionDays = 7
$containerSoftDeleteRetentionDays = 7
$indexDocumentName = "index.html"
$errorDocumentName = "404.html"
$tagSpokeName = #<your environment tag name here> The environment tag name you want to use. Example:"Env"
$tagSpokeValue = #<your environment tag value here> The environment tag value you want to use. Example: "Hub"
$tagCostCenterName = #<your costCenter tag name here> The costCenter tag name you want to use. Example:"CostCenter"
$tagCostCenterValue = #<your costCenter tag value here> The costCenter tag value you want to use. Example: "23"
$tagCriticalityName = #<your businessCriticality tag name here> The businessCriticality tag name you want to use. Example: "Criticality"
$tagCriticalityValue = #<your businessCriticality tag value here> The businessCriticality tag value you want to use. Example: "High"
$tagPurposeName = #<your purpose tag name here> The purpose tag name you want to use. Example:"Purpose"
$tagSkuName = "Sku"
$tagSkuValue = $storageAccountSkuName
Set-PSBreakpoint -Variable currenttime -Mode Read -Action {$global:currenttime = Get-Date -Format "dddd MM/dd/yyyy HH:mm"} | Out-Null
$foregroundColor1 = "Green"
$foregroundColor2 = "Yellow"
$foregroundColor3 = "Red"
$writeEmptyLine = "`n"
$writeSeperatorSpaces = " - "
## ---------------------------------------------------------------------------------------------------------------------------------------------------------------------------------------------
## Remove the breaking change warning messages
Set-Item -Path Env:\SuppressAzurePowerShellBreakingChangeWarnings -Value $true | Out-Null
Update-AzConfig -DisplayBreakingChangeWarning $false | Out-Null
## ---------------------------------------------------------------------------------------------------------------------------------------------------------------------------------------------
## Write script started
Write-Host ($writeEmptyLine + "# Script started. Without errors, it can take up to 2 minutes to complete" + $writeSeperatorSpaces + $currentTime)`
-foregroundcolor $foregroundColor1 $writeEmptyLine
## ---------------------------------------------------------------------------------------------------------------------------------------------------------------------------------------------
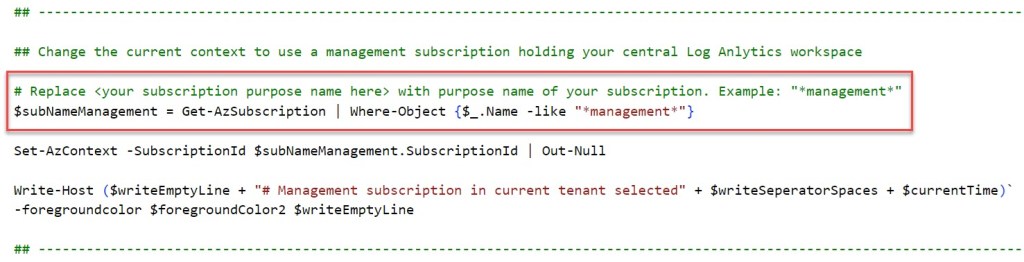
## Change the current context to use a management subscription holding your central Log Anlytics workspace
# Replace <your subscription purpose name here> with purpose name of your subscription. Example: "*management*"
$subNameManagement = Get-AzSubscription | Where-Object {$_.Name -like "*management*"}
Set-AzContext -SubscriptionId $subNameManagement.SubscriptionId | Out-Null
Write-Host ($writeEmptyLine + "# Management subscription in current tenant selected" + $writeSeperatorSpaces + $currentTime)`
-foregroundcolor $foregroundColor2 $writeEmptyLine
## ---------------------------------------------------------------------------------------------------------------------------------------------------------------------------------------------
## Save Log Analytics workspace from the management subscription in a variable
$workSpace = Get-AzOperationalInsightsWorkspace | Where-Object Name -Match $logAnalyticsWorkSpaceName
Write-Host ($writeEmptyLine + "# Log Analytics workspace variable created" + $writeSeperatorSpaces + $currentTime)`
-foregroundcolor $foregroundColor2 $writeEmptyLine
## ---------------------------------------------------------------------------------------------------------------------------------------------------------------------------------------------
## Change the current context to the specified subscription
$subName = Get-AzSubscription | Where-Object {$_.Name -like $subscriptionName}
Set-AzContext -SubscriptionId $subName.SubscriptionId | Out-Null
Write-Host ($writeEmptyLine + "# Specified subscription in current tenant selected" + $writeSeperatorSpaces + $currentTime)`
-foregroundcolor $foregroundColor2 $writeEmptyLine
## ---------------------------------------------------------------------------------------------------------------------------------------------------------------------------------------------
## Store the specified set of tags in a hash table
$tags = @{$tagSpokeName=$tagSpokeValue;$tagCostCenterName=$tagCostCenterValue;$tagCriticalityName=$tagCriticalityValue;$tagPurposeName=$purpose}
Write-Host ($writeEmptyLine + "# Specified set of tags available to add" + $writeSeperatorSpaces + $currentTime)`
-foregroundcolor $foregroundColor2 $writeEmptyLine
## ---------------------------------------------------------------------------------------------------------------------------------------------------------------------------------------------
## Create a resource group for the storage account if it does not already exist. Also, apply the necessary tags to this resource group
try {
Get-AzResourceGroup -Name $rgNameStorage -ErrorAction Stop | Out-Null
} catch {
New-AzResourceGroup -Name $rgNameStorage -Location $region -Force | Out-Null
}
# Save variable tags in a new variable to add tags to the resource group
$tagsResourceGroup = $tags
# Set tags for the storage account resource group
Set-AzResourceGroup -Name $rgNameStorage -Tag $tagsResourceGroup | Out-Null
Write-Host ($writeEmptyLine + "# Resource group $rgNameStorage available" + $writeSeperatorSpaces + $currentTime)`
-foregroundcolor $foregroundColor2 $writeEmptyLine
## ---------------------------------------------------------------------------------------------------------------------------------------------------------------------------------------------
## Create a general-purpose v2 storage account if it does not already exist; otherwise, exit the script. Also, apply the necessary tags to this storage account
try {
$storageAccountObject = Get-AzStorageAccount -ResourceGroupName $rgNameStorage -Name $storageAccountName -ErrorAction Stop
Write-Host ($writeEmptyLine + "# Storage account already exists, please validate" + $writeSeperatorSpaces + $currentTime)`
-foregroundcolor $foregroundColor3 $writeEmptyLine
Start-Sleep -s 3
Write-Host -NoNewLine ("# Press any key to exit the script ..." + $writeEmptyLine)`
-foregroundcolor $foregroundColor1 $writeEmptyLine;
$Host.UI.RawUI.ReadKey("NoEcho,IncludeKeyDown") | Out-Null;
return
} catch {
$storageAccountObject = New-AzStorageAccount -ResourceGroupName $rgNameStorage -Name $storageAccountName -SkuName $storageAccountSkuName -Location $region -Kind $storageAccountType `
-AllowBlobPublicAccess $true -AllowSharedKeyAccess $true -MinimumTlsVersion $storageMinimumTlsVersion
}
# Save variable tags in a new variable to add tags
$tagsStorageAccount = $tags
# Add Sku tag to tags for the storage account
$tagsStorageAccount += @{$tagSkuName = $tagSkuValue}
# Set tags storage account
Set-AzStorageAccount -ResourceGroupName $rgNameStorage -Name $storageAccountName -Tag $tagsStorageAccount | Out-Null
Write-Host ($writeEmptyLine + "# Storage account $storageAccountName created" + $writeSeperatorSpaces + $currentTime)`
-foregroundcolor $foregroundColor2 $writeEmptyLine
## ---------------------------------------------------------------------------------------------------------------------------------------------------------------------------------------------
## Set the log and metrics settings for the storage account and blob resource if they don't exist
# Log and metrics settings for the storage account
$storageAccount = Get-AzStorageAccount -ResourceGroupName $rgNameStorage -Name $storageAccountName
try {
Get-AzDiagnosticSetting -Name $storageAccountDiagnosticsName -ResourceId ($storageAccount.Id) -ErrorAction Stop | Out-Null
} catch {
$metric = @()
$metric += New-AzDiagnosticSettingMetricSettingsObject -Enabled $true -Category AllMetrics
New-AzDiagnosticSetting -Name $storageAccountDiagnosticsName -ResourceId ($storageAccount.Id) -WorkspaceId ($workSpace.ResourceId) -Log $log -Metric $metric | Out-Null
}
# Log and metrics settings for blob
$resourceId = ($storageAccount.Id) + "/blobServices/default"
$log = @()
$metric = @()
# Get diagnostic settings categories for blob
$categories = Get-AzDiagnosticSettingCategory -ResourceId $resourceId
# Create diagnostic setting for all supported categories
$categories | ForEach-Object {
if ($_.CategoryType -eq "Metrics") {
$metric += New-AzDiagnosticSettingMetricSettingsObject -Enabled $true -Category $_.Name
} else {
$log += New-AzDiagnosticSettingLogSettingsObject -Enabled $true -Category $_.Name
}
}
try {
Get-AzDiagnosticSetting -Name $storageAccountDiagnosticsName -ResourceId $resourceId -ErrorAction Stop | Out-Null
} catch {
New-AzDiagnosticSetting -Name $storageAccountDiagnosticsName -ResourceId $resourceId -WorkspaceId ($workSpace.ResourceId) -Log $log -Metric $metric | Out-Null
}
Write-Host ($writeEmptyLine + "# Storage account $storageAccountName and blob diagnostic settings set" + $writeSeperatorSpaces + $currentTime)`
-foregroundcolor $foregroundColor2 $writeEmptyLine
## ---------------------------------------------------------------------------------------------------------------------------------------------------------------------------------------------
## Enable blob soft delete
Enable-AzStorageBlobDeleteRetentionPolicy -ResourceGroupName $rgNameStorage -Name $storageAccountName -RetentionDays $blobSoftDeleteRetentionDays
Write-Host ($writeEmptyLine + "# Blob soft delete enabled for storage account $storageAccountName with a retention period of $blobSoftDeleteRetentionDays days" + $writeSeperatorSpaces `
+ $currentTime) -foregroundcolor $foregroundColor2 $writeEmptyLine
## ---------------------------------------------------------------------------------------------------------------------------------------------------------------------------------------------
## Enable container soft delete
Enable-AzStorageContainerDeleteRetentionPolicy -ResourceGroupName $rgNameStorage -Name $storageAccountName -RetentionDays $containerSoftDeleteRetentionDays
Write-Host ($writeEmptyLine + "# Container soft delete enabled for storage account $storageAccountName with a retention period of $blobSoftDeleteRetentionDays days" + $writeSeperatorSpaces `
+ $currentTime) -foregroundcolor $foregroundColor2 $writeEmptyLine
## ---------------------------------------------------------------------------------------------------------------------------------------------------------------------------------------------
## Enable static website hosting
$storageAccount = Get-AzStorageAccount -ResourceGroupName $rgNameStorage -Name $storageAccountName
Enable-AzStorageStaticWebsite -Context $storageAccount.Context -IndexDocument $indexDocumentName -ErrorDocument404Path $errorDocumentName | Out-Null
Write-Host ($writeEmptyLine + "# Static website hosting enabled for storage account $storageAccountName" + $writeSeperatorSpaces + $currentTime)`
-foregroundcolor $foregroundColor2 $writeEmptyLine
## ---------------------------------------------------------------------------------------------------------------------------------------------------------------------------------------------
## Modify the storage account to set blob public access to disabled
Set-AzStorageAccount -ResourceGroupName $rgNameStorage -Name $storageAccountName -AllowBlobPublicAccess $false | Out-Null
Write-Host ($writeEmptyLine + "# Storage account $storageAccountName public blob set to disabled" + $writeSeperatorSpaces + $currentTime)`
-foregroundcolor $foregroundColor2 $writeEmptyLine
## ---------------------------------------------------------------------------------------------------------------------------------------------------------------------------------------------
## Lock the storage account resource group with a CanNotDelete lock
$lock = Get-AzResourceLock -ResourceGroupName $rgNameStorage
if ($null -eq $lock){
New-AzResourceLock -LockName DoNotDeleteLock -LockLevel CanNotDelete -ResourceGroupName $rgNameStorage -LockNotes "Prevent $rgNameStorage from deletion" -Force | Out-Null
}
Write-Host ($writeEmptyLine + "# Resource group $rgNameStorage locked" + $writeSeperatorSpaces + $currentTime)`
-foregroundcolor $foregroundColor2 $writeEmptyLine
## ---------------------------------------------------------------------------------------------------------------------------------------------------------------------------------------------
## Write script completed
Write-Host ($writeEmptyLine + "# Script completed" + $writeSeperatorSpaces + $currentTime)`
-foregroundcolor $foregroundColor1 $writeEmptyLine
## ---------------------------------------------------------------------------------------------------------------------------------------------------------------------------------------------


Use Visual Studio Code to upload content
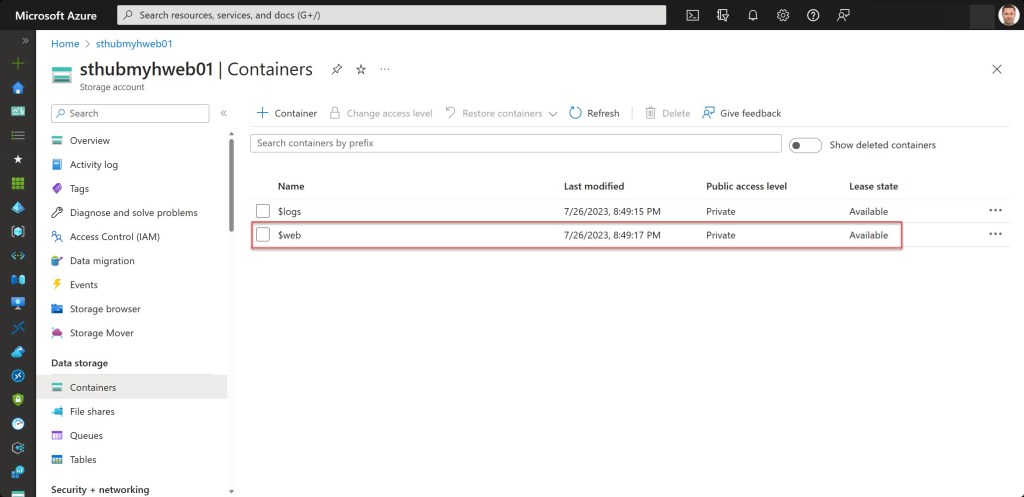
To upload your content to the $web container, you have several options, including Azure CLI, Azure PowerShell, AzCopy, and Azure Storage Explorer. However, my preferred choice is Visual Studio Code.
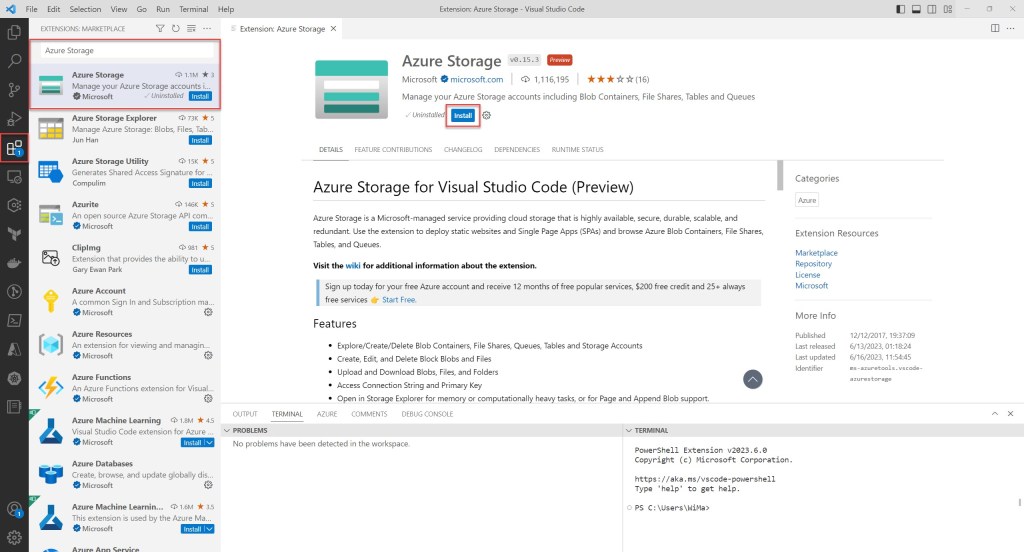
To get started, make sure you have the Azure Storage preview extension installed. This extension seamlessly integrates Azure Storage management functionality with Visual Studio Code, enabling you to upload any content to your static website on Azure Storage.
To install the extension, launch Visual Studio Code and click on Extensions. Next, search for “Azure Storage” in the extensions marketplace and select the appropriate extension from the list. Finally, click the Install button to initiate the installation process.
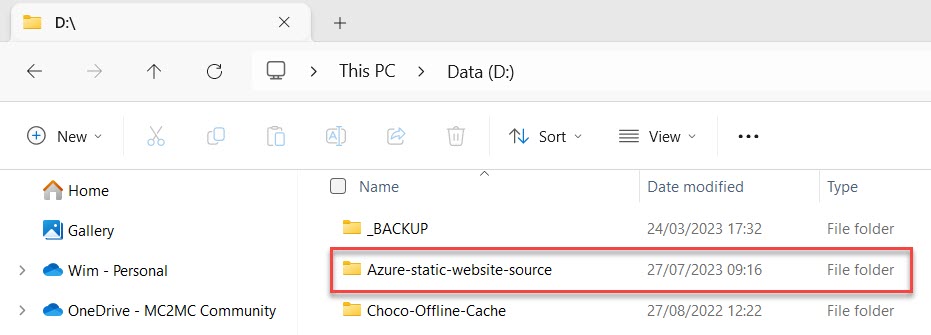
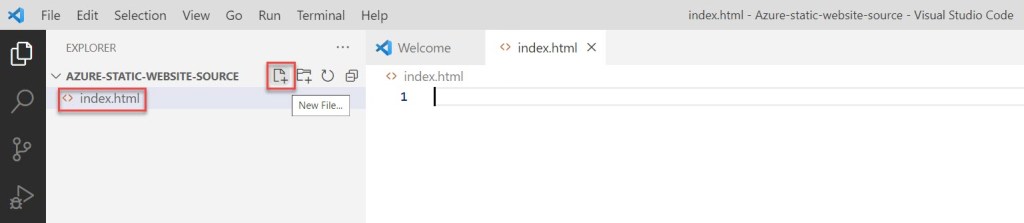
Next, you can create your static webpages with Visual Studio Code and deploy them to your static website hosted in your Azure Storage account. To begin, create a folder on your client device; for instance, name it “Azure-static-website-source”. Then, open this folder from the Visual Studio Code menu bar, by selecting File > Open > Folder and navigating to the folder’s location. Afterward, follow the steps to ensure proper authorization for all the files within this folder.

Then create the default index file in the folder and name it “index.html.” Once the file is created, open it.
Next, simply paste your content into the editor and save it. If you are not very familiar with the HTML language, don’t worry; you can refer to the example HTML template provided below to make things a bit easier.

<!doctype html>
<html>
  <head>
    <title>Wim Matthyssen - Static website hosting in Azure Storage demo</title>
  </head>
  <body>
    <body style="background-color:rgba(22, 42, 89, 0.692);"></body>
    <h1><font color="white">This is a demo of an Azure static website running on an Azure Storage account.</font></h1>
  </body>
</html>
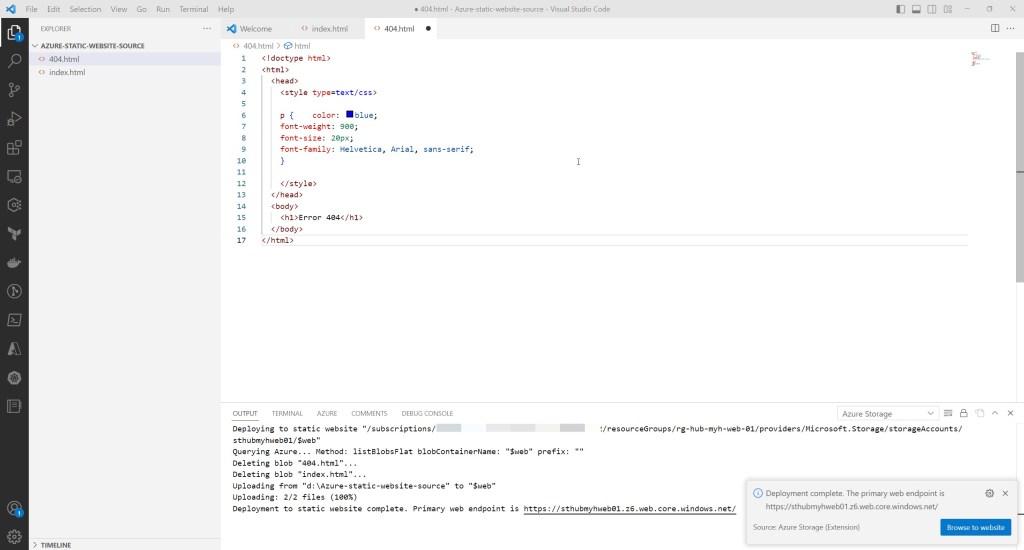
Next, also create a default error file and name it “404.html“.
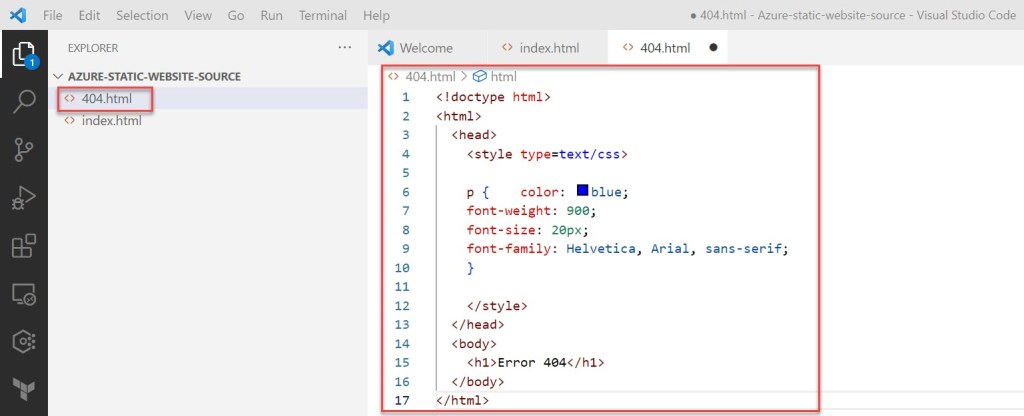
<!doctype html>
<html>
  <head>
    <style type=text/css>

    p {    color: blue;
    font-weight: 900;
    font-size: 20px;
    font-family: Helvetica, Arial, sans-serif;
    }

    </style>
  </head>
  <body>
    <h1>Error 404</h1>
  </body>
</html>
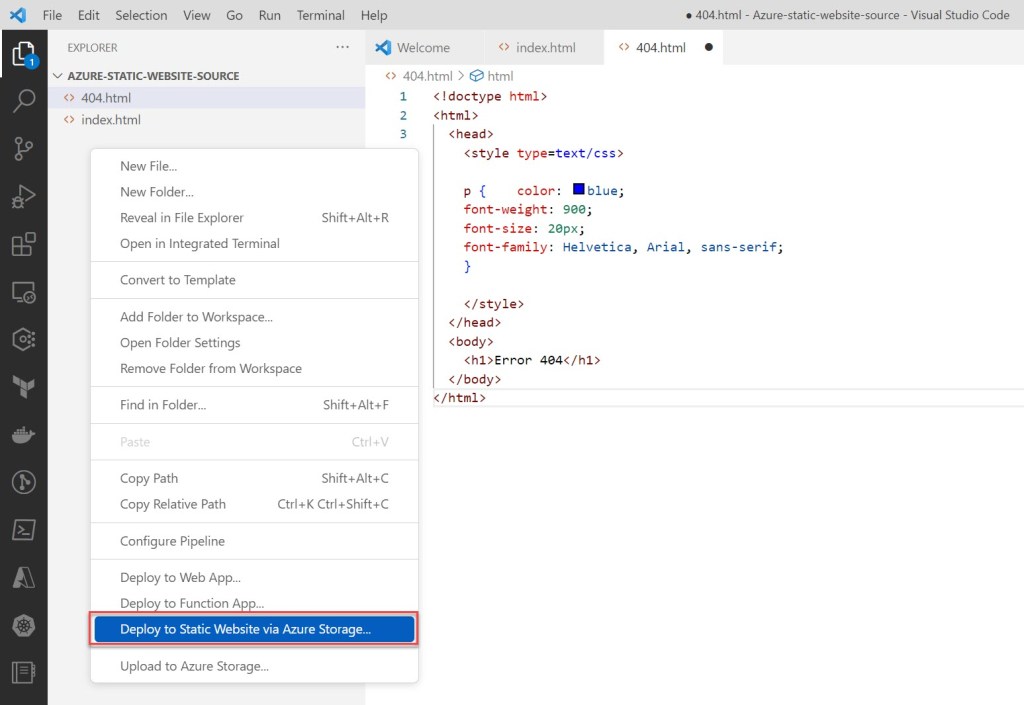
To deploy your website, right-click somewhere under your folder in the Explorer panel. Then, select “Deploy to Static Website via Azure Storage…” from the options. You will be prompted to log in to Azure to retrieve a list of subscriptions.
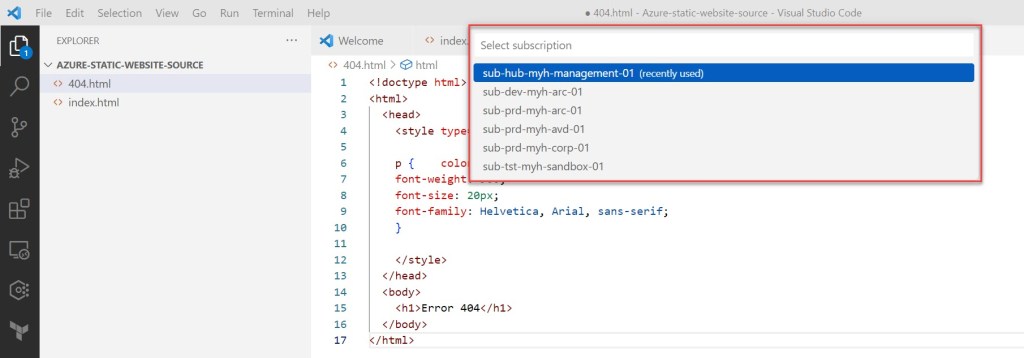
Choose the subscription that contains the storage account for which you have enabled static website hosting. Then, when prompted, select the respective storage account.
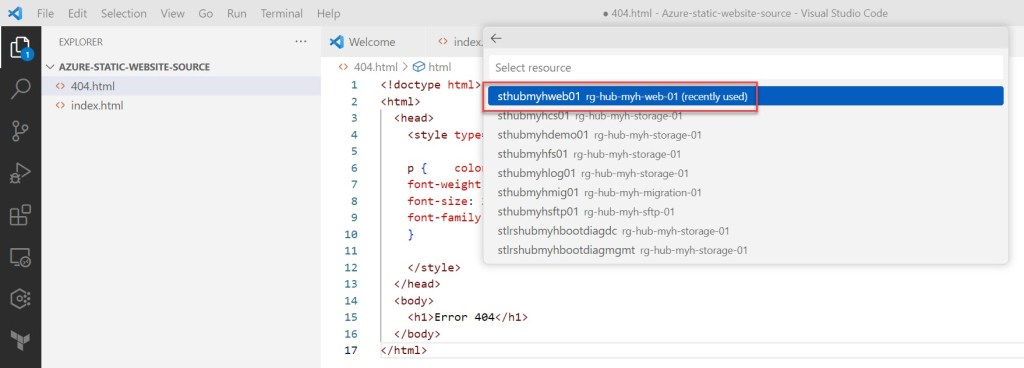
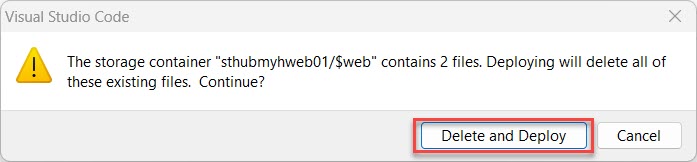
If the same HTML files already exist in the $web container, just click on Delete and Deploy in the pop-up window to proceed.
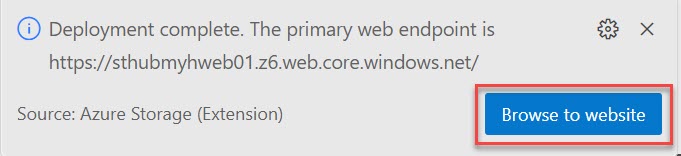
Visual Studio Code will then upload your files to the web endpoint, and when all goes well, it will display the success status bar. To view the website in Azure, simply launch it by clicking on Browse to website.

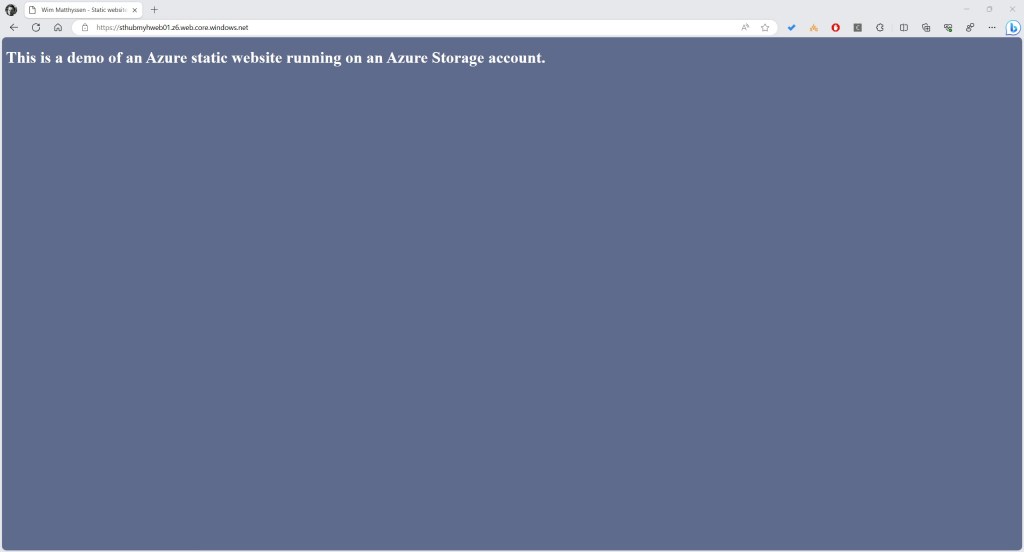
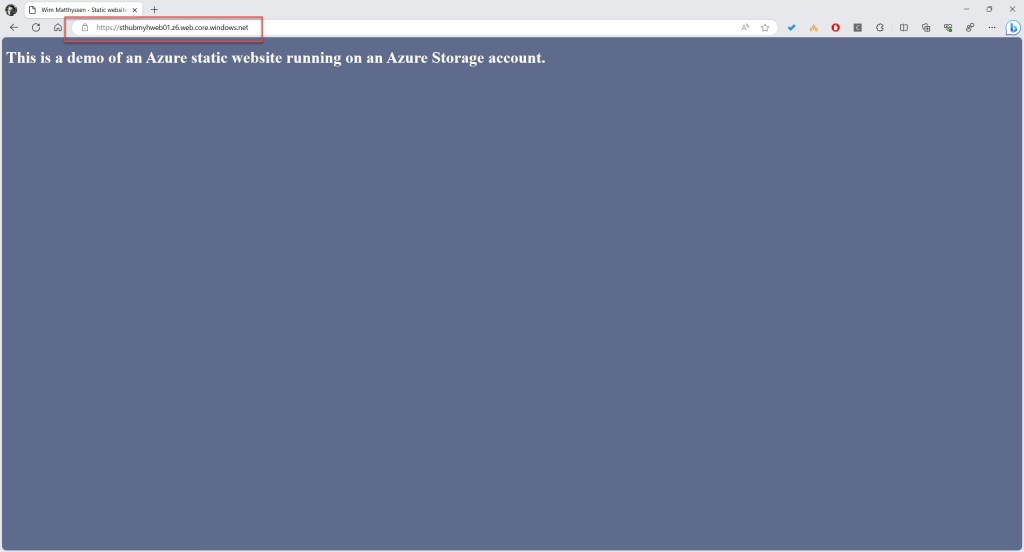
View static website
Users can view the site content from a browser by accessing the public URL of the website. You can find this URL through various methods, such as using the Azure portal, Azure CLI, or PowerShell.
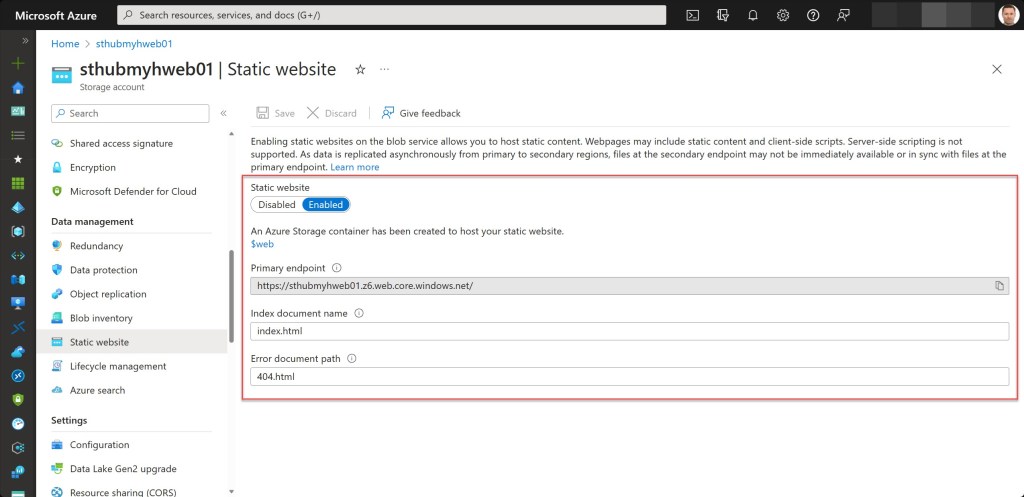
To find the website URL, head over to your storage account and select Static Website. Your site’s URL will be displayed in the Primary endpoint field.

You can then copy the link and paste it into your browser.
Conclusion
Azure Storage static website hosting is a great optionin cases where there is no need for a dedicated web server to handle content rendering.
By leveraging this feature, you can serve static web pages and assets directly from your Azure Storage account. This not only simplifies the deployment process but also eliminates the operational overhead of managing a traditional web server.
I hope the Azure PowerShell script is useful for you and provides you with a good starting point for hosting a static website in your Azure environment using an Azure storage account.
Should you have any questions or suggestions regarding the script, feel free to reach out to me through my Twitter handle (@wmatthyssen) or simply leave a comment, and I’ll be more than happy to assist.

Pingback: Combine a static website hosted on an Azure storage account with Azure CDN by using an Azure PowerShell script – Wim Matthyssen